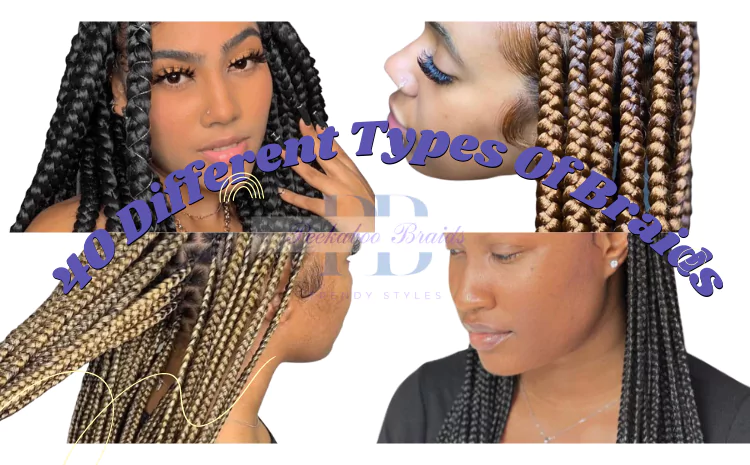
Braids are a versatile and stylish hairstyle that can be worn by people of all ages and hair types. There are over 40 different types of braid hairstyles, each with its own unique look and feel. From simple cornrows to intricate French braids, there is a braid style out there for everyone.
In this blog post, we will explore 40 different types of braids. We will discuss the history of braids, the different types of braids, and how to care for your braids. We will also provide some tips for choosing the right braid style for your hair type and occasion.
So whether you are looking for a new hairstyle for everyday wear or a special occasion, we have you covered. Keep reading to learn more about the different types of braids!
40 Different Types Of Braids
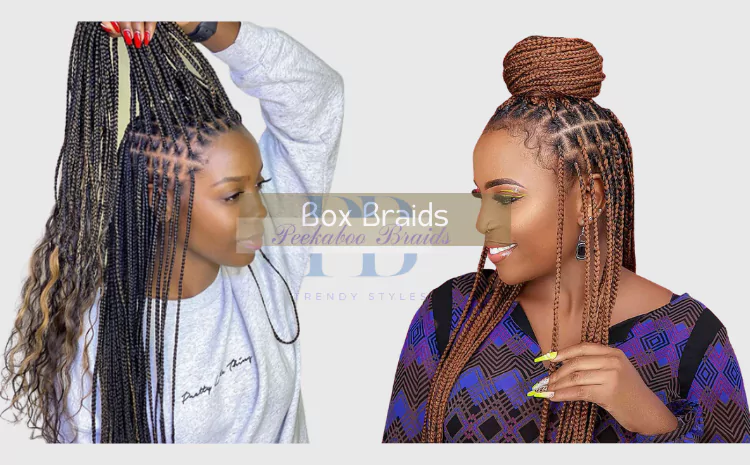
Box Braids
Box braids with beads are characterized by small, square-shaped sections of hair that are braided from the scalp to the ends. These box braids with curly ends are versatile and protective, making them popular for various hair types and lengths.
Step-by-Step Guide for Box Braids
- Preparation: Start with clean, detangled hair. Divide hair into sections for easy braiding.
- Extension Selection: Choose synthetic or natural hair extensions in your preferred color and length.
- Sectioning: Take a small section of hair and secure the extension at the root. Divide into three equal strands.
- Braiding: Begin braiding by crossing the right strand over the middle, then the left over the new middle strand.
- Adding Extensions: As you braid, incorporate new hair from each side with the existing strands, keeping tension consistent.
- Consistency: Braid tightly and evenly to ensure neat and uniform braids.
- Length: Continue braiding until desired length is reached, leaving a small section unbraided at the end.
- Sealing: Use hot water to seal the ends, preventing unraveling. Trim any excess extensions.
Styling Tips for Box Braids
- Accessorize: Add beads, cuffs, or strings for personalized flair.
- Updos: Experiment with ponytails, buns, or half-up styles for versatility.
- Maintenance: Moisturize the scalp and edges to prevent dryness.
- Night Care: Tie a satin scarf or use a satin pillowcase to protect braids while sleeping.
- Washing: Cleanse scalp gently using a diluted shampoo, and avoid heavy products.
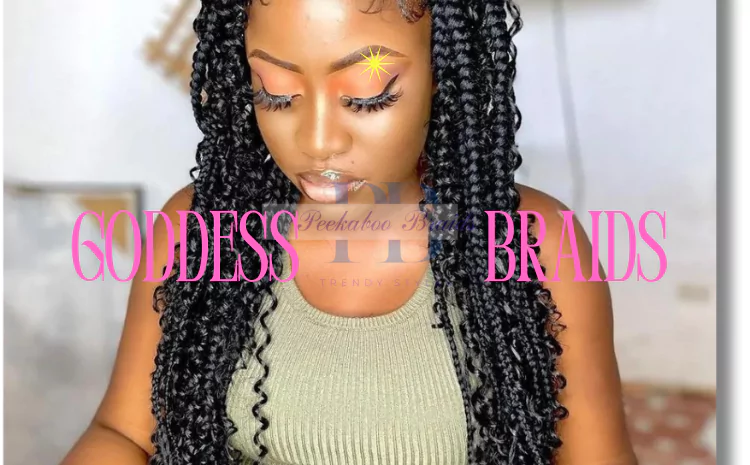
Goddess Braids
Goddess braids exude regal elegance, intertwining intricate patterns that mirror the grace of ancient goddesses. These majestic plaits, often larger in size, empower with a celestial allure, framing the head in a crown-like masterpiece. The style’s grandeur and cultural significance make it a captivating choice for those seeking a divine transformation.
Goddess Braids: Step-by-Step Guide
- Preparation: Start with clean, detangled hair. You can wash and condition your hair before beginning.
- Parting: Create neat partings to section your hair. The size and direction of your partings will determine the pattern of your Goddess braids.
- Cornrowing: Begin cornrowing the first section of hair close to the scalp. Use a small amount of hair at the start and add more as you go. Secure the end with a rubber band.
- Adding Extensions (Optional): If desired, add hair extensions for length and thickness. Secure the extension to your natural hair before continuing the cornrow.
- Braiding: As you continue braiding, add more hair from the parted section into the cornrow. Keep the tension even for a sleek and neat appearance.
- Incorporating Patterns: Depending on your chosen pattern, continue braiding the section, following the cornrow’s curve or direction.
- Repeat: Repeat the process for each section of hair, creating multiple Goddess braids. You can experiment with different patterns and sizes.
- Finishing: Once all braids are done, remove any rubber bands from the ends. You can apply hair gel or edge control for a polished look.
Styling Tips
- Size and Quantity: Goddess braids can be thick or thin, and you can choose how many you want. Larger braids create a bolder look, while smaller ones offer intricacy.
- Accessories: Enhance your Goddess braids with beads, cuffs, or hair jewelry for added flair and personalization.
- Versatility: Style your Goddess braids into updos, buns, or ponytails for various looks. You can also let them hang loose for an elegant touch.
- Edge Control: Use edge control products to maintain a clean and sleek hairline, ensuring your braids stay neat and well-defined.
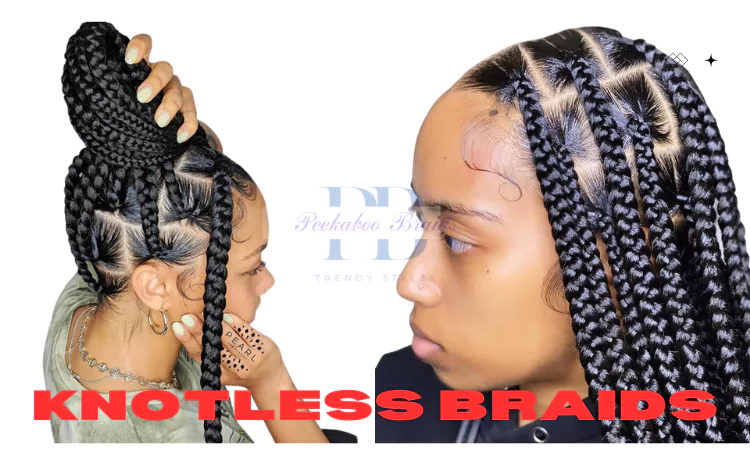
Knotless Braids
Knotless braids, a modern take on traditional box braids, offer a gentler approach. These seamless and pain-free braids start with your natural hair, eliminating the initial tension and discomfort of traditional methods. The absence of bulky knots ensures a more natural look and hassle-free wear, promoting hair health and comfort.
Knotless Braids Step-by-Step Guide
- Preparation: Wash and condition your hair. Section it into manageable parts.
- Adding Extensions: Start with a small section of natural hair. Attach extension hair using the feed-in technique, ensuring a seamless blend.
- Braiding: Divide the combined hair into three sections. Begin braiding close to the scalp, adding more extension hair as you move downward.
- Tension Control: Maintain even tension to prevent discomfort and hair loss.
- Length and Thickness: Braid to your desired length, and secure with a rubber band.
- Repeat: Continue the process, creating neat and uniform braids across your head.
- Finishing Touches: Dip the ends in hot water to seal and prevent fraying.
Knotless Braids Styling Tips
- Natural Look: Knotless braids offer a more natural appearance without the bulky knots at the base.
- Versatility: Style your knotless braids in various updos, ponytails, or let them flow loose.
- Less Tension: Reduced tension means less strain on your scalp, promoting healthier hair growth.
- Longevity: Knotless braids can last for several weeks with proper care.
- Low Maintenance: Easier to maintain and comfortable to wear compared to traditional braids.
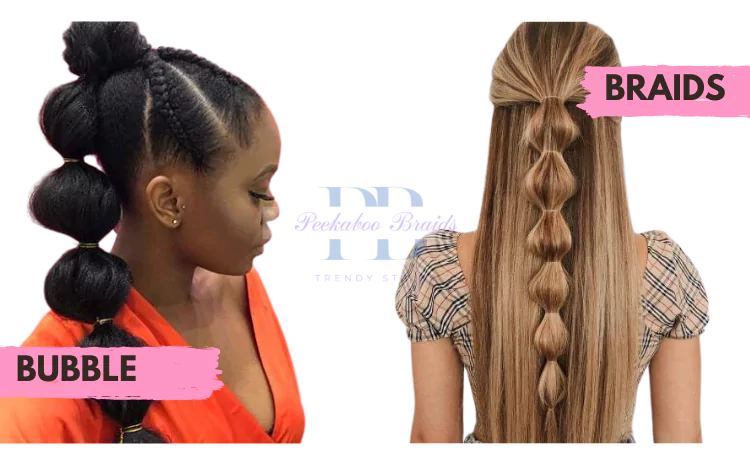
Bubble Braids
Bubble braids are a fun and creative hairstyle that adds a playful twist to traditional braiding. By securing sections of hair with elastic bands, these “bubbles” create volume and dimension, offering a unique and eye-catching look. Perfect for adding a touch of whimsy and charm to any occasion.
Step-by-Step Guide
- Preparation: Start with clean, dry hair. Detangle and apply a light styling product for hold and shine.
- Sectioning: Divide your hair into sections using a comb. Secure the top section with a hair tie.
- Bubble Formation: Take a small section of hair from the top section and create a ponytail with a hair tie. Leave some hair loose underneath.
- Bubble Effect: Gently tug and pull the hair between the hair tie and your scalp to create the “bubble” effect. Secure with another hair tie a few inches down.
- Repeat: Repeat steps 3 and 4, creating additional “bubbles” down the length of your hair. Make sure each bubble is evenly spaced.
- Finishing Touches: Secure the ends with a hair tie. Gently tug and fan out each bubble to create volume and fullness.
Styling Tips
- Accessorize: Add colorful hair ties, ribbons, or beads between each bubble for a playful and stylish touch.
- Half-Up Style: Gather the top bubbles into a half-up ponytail, leaving the rest of the bubbles cascading down for a chic look.
- Loose Ends: Leave the ends of the braids loose or create a bun or ponytail with them for a versatile finish.
- Variation: Experiment with different bubble sizes for a unique and eye-catching effect.
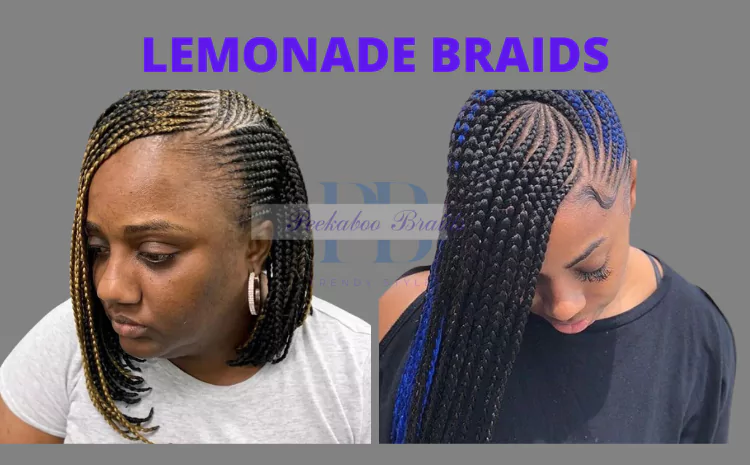
Lemonade Braids
Lemonade Braids, famously rocked by Beyoncé, are sleek, long, and stylish braids that cascade like lemon slices. These braids offer a refreshing and vibrant look, combining edge and elegance. They embody confidence and empowerment, making a bold statement that’s as iconic as the artist who popularized them.
Step-by-Step Guide
- Prepare Your Hair: Start with clean, dry hair. Detangle and moisturize your scalp and hair for a smooth foundation.
- Part Your Hair: Create a deep middle part, dividing your hair into two sections. Clip one section aside.
- Begin Braiding: Take a small section of hair near the front of your head. Divide it into three strands and start a Dutch braid, crossing strands under each other. Incorporate additional hair from the parted section as you braid.
- Add Extensions: Once you reach the desired length, incorporate hair extensions to continue the braid. This adds length and thickness.
- Continue Braiding: Braid down your scalp, following your natural hairline. Keep the tension even for a neat and uniform look.
- Secure the End: When you reach the end of your hair, secure the braid with a small hair tie or elastic band.
- Repeat on the Other Side: Unclip the other section and repeat the braiding process on the opposite side of your head.
- Style: Once both braids are complete, style them to your liking. You can leave them hanging, create a bun, or tie them together at the back.
Styling Tips for Lemonade Braids
- Extensions: Opt for high-quality, lightweight extensions for a seamless blend and comfortable wear.
- Braid Size: Adjust the thickness of the braids to achieve your desired look – thinner for intricate styles, thicker for a bold statement.
- Accessories: Add beads, cuffs, or hair jewelry to enhance the style and personalize your look.
- Edge Control: Use edge control gel to keep your edges smooth and polished.
- Maintenance: Keep your scalp moisturized and clean to promote healthy hair growth and prevent itchiness.
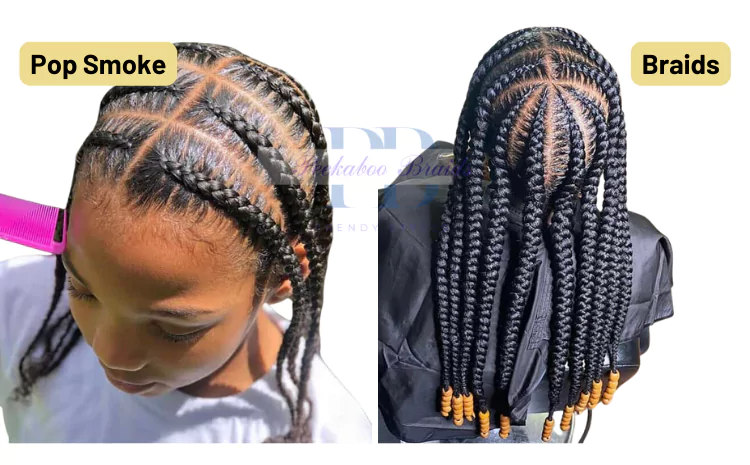
Pop Smoke Braids
Pop Smoke Braids pay homage to the late rapper’s iconic style, characterized by bold and tightly woven braids. These braids capture his edgy and confident aura, often featuring intricate patterns and adding a touch of urban flair to your look. A stylish tribute to a rap legend.
Guide for Pop Smoke Braids
- Prepare Hair: Start with clean, detangled hair. If desired, you can add hair extensions for extra length and thickness.
- Sectioning: Part your hair into neat sections using a comb. The number of sections depends on how many braids you want.
- Cornrowing: Begin cornrowing each section close to the scalp. Use a small amount of styling gel to smooth and secure the roots.
- Braiding: Start braiding the cornrow, adding extensions if preferred for a longer look. Keep the braids tight and consistent.
- Intricate Patterns: Experiment with various braid patterns, such as diagonal, zig-zag, or curved designs, to emulate Pop Smoke’s unique style.
- Secure Ends: Secure the ends with a hair tie or rubber band. You can also seal the ends with hot water to prevent unraveling.
Styling Tips
- Accessorize: Enhance the look with metal cuffs, beads, or colored strings for added flair and personalization.
- Sleek Finish: Apply edge control to tame flyaways and achieve a polished finish around the hairline.
- Versatile Styles: Create versatile looks by pulling the braids into a high bun, ponytail, or half-up style.
- Maintenance: Keep your scalp moisturized to promote healthy hair growth and prevent breakage.
- Confidence: Embrace the boldness of Pop Smoke’s style and rock your braids with confidence.
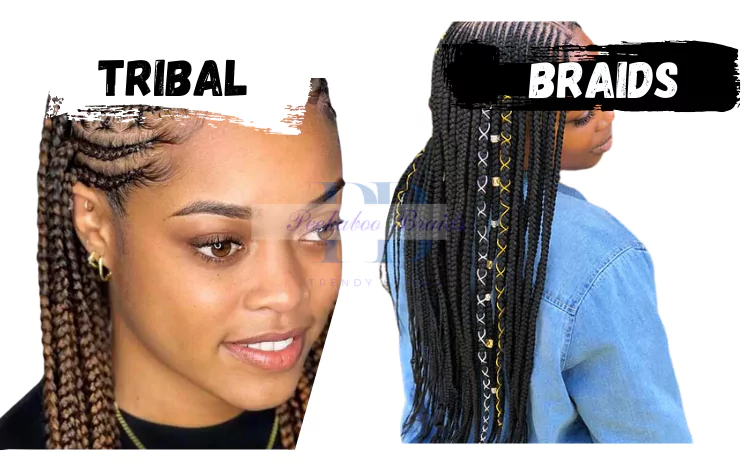
Tribal Braids
Tribal braids weave a rich tapestry of culture and style, drawing inspiration from diverse traditions. These bold and intricate braids showcase patterns that tell stories, reflecting heritage and individuality. A captivating blend of artistry and self-expression, tribal braids honor history while embracing modern creativity.
Step-by-Step Guide
- Prepare and Section: Start with clean, detangled hair. Divide it into sections using a rat-tail comb. The number of sections will depend on the desired pattern and size of your braids.
- Create Cornrows: Begin by creating neat and tight cornrows along the scalp. Use a small amount of hair gel or edge control to keep the edges sleek and secure.
- Braid Extensions: Attach synthetic braiding hair to each cornrow using the feed-in method. As you braid, add extensions gradually for a seamless look.
- Weave Patterns: Depending on your chosen tribal design, weave the braids into intricate patterns, zig-zags, or geometric shapes. Maintain tension and consistency for a polished finish.
- Secure Ends: Once you’ve achieved the desired length, secure the ends of the braids using rubber bands or hair ties.
Styling Tips
- Pattern Inspiration: Research tribal patterns and cultural designs for inspiration. Incorporate symbols and motifs that hold significance or represent your heritage.
- Extensions Choice: Opt for high-quality braiding hair in various colors to add vibrancy and authenticity to your tribal braids.
- Edge Control: Keep your edges looking sleek by applying edge control gel or pomade along the hairline and partings.
- Beads and Accessories: Embellish your tribal braids with decorative beads, cuffs, or thread in coordinating colors to enhance the overall look.
- Maintenance: Keep your scalp moisturized and braids clean. Use a lightweight oil to hydrate the scalp and prevent itching.
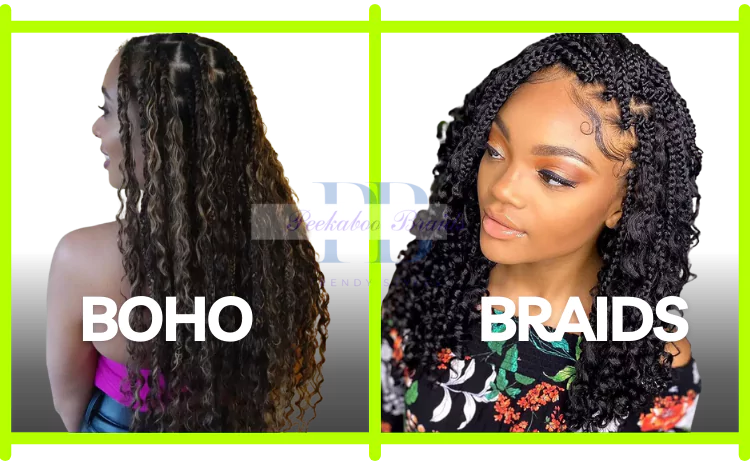
Boho Braids
Boho braids embody carefree elegance, channeling a whimsical and bohemian vibe. These braids intertwine textured strands in an effortlessly artistic way, often adorned with beads, feathers, or flowers. A perfect choice for festival looks or casual days, boho braids capture the spirit of free-spirited beauty.
Step-by-Step Guide: Boho Braids
- Preparation: Start with clean, dry hair. For added texture, use a texturizing spray or dry shampoo.
- Sectioning: Divide your hair into two or more sections, depending on the desired braid style. Center or side parts work well for a boho look.
- Braiding: Begin a loose three-strand braid on each section. Keep the tension relaxed for a carefree appearance.
- Loosening: After securing the ends with a hair tie, gently pull and tug on the sides of the braid to loosen and create a voluminous effect.
- Messy Touch: To enhance the boho feel, gently pull out a few wisps of hair around your face and along the braid for an undone look.
- Adornments: Add bohemian flair with beads, feathers, or small flowers. Insert them randomly along the braid for an eclectic touch.
Styling Tips
- Texture: Embrace natural texture or create waves with a curling iron before braiding for added dimension.
- Accessories: Incorporate boho-style hairpins, clips, or headbands to complement the braids.
- Mix and Match: Combine different braid types, such as fishtail or waterfall braids, for a unique and intricate appearance.
- Half-Up Variation: Try a half-up, half-down style with boho braids framing your face while the rest of your hair flows freely.
- Boho Updo: Gather multiple boho braids into a loose bun or messy updo for a festival-ready look.
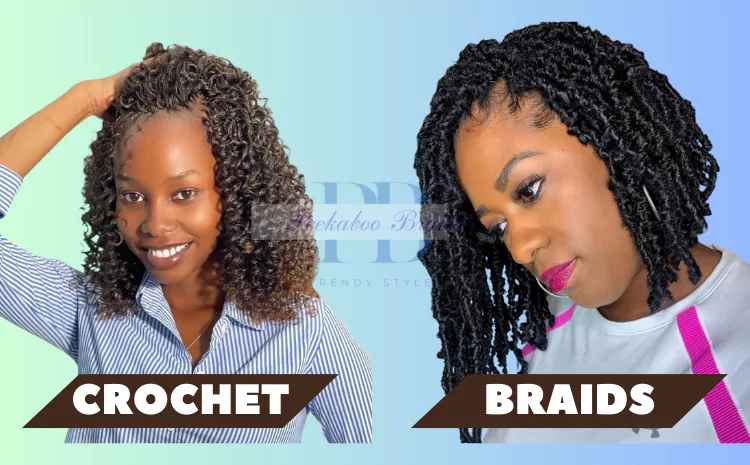
Crochet Braids
Crochet braids offer a quick and stylish way to transform your hair. Using a crochet hook, extensions are looped through cornrows, creating a seamless and versatile look. With various textures and lengths available, crochet braids allow for endless creativity and low-maintenance beauty. Elevate your style effortlessly with crochet braids.
Step-by-Step Guide: Crochet Braids
- Preparation: Wash and condition your natural hair. Choose the desired crochet braid style and extensions. Cornrow your hair into neat and even rows as the base.
- Crochet Process: Use a latch hook crochet needle to pull the extensions through the cornrows. Open the latch, insert the hook, place the extension, and close the latch. Pull the extension through, leaving a loop.
- Attachment: Fold the extension in half, creating a loop at one end. Insert the loop through the loop on the cornrow. Pull the ends of the extension through the loop, securing it tightly to the cornrow.
- Even Placement: Continue attaching extensions, working row by row, ensuring even distribution and coverage. Pay attention to the tension to prevent discomfort.
- Length and Style: Trim the extensions to your desired length. Style the crochet braids as you wish, such as leaving them loose, creating updos, or pulling them into a ponytail.
Styling Tips: Crochet Braids
- Texture Play: Experiment with different hair textures, from straight to curly, for a dynamic look that suits your style.
- Color Variations: Explore various shades and highlights to add depth and vibrancy to your crochet braids.
- Accessorize: Enhance your look with beads, cuffs, or headbands for added flair and personalization.
- Versatile Styles: Change your style effortlessly by pulling the crochet braids into different updos, buns, or half-up styles.
- Night Care: Wrap your crochet braids in a silk scarf or bonnet before sleeping to preserve the style and prevent frizz.
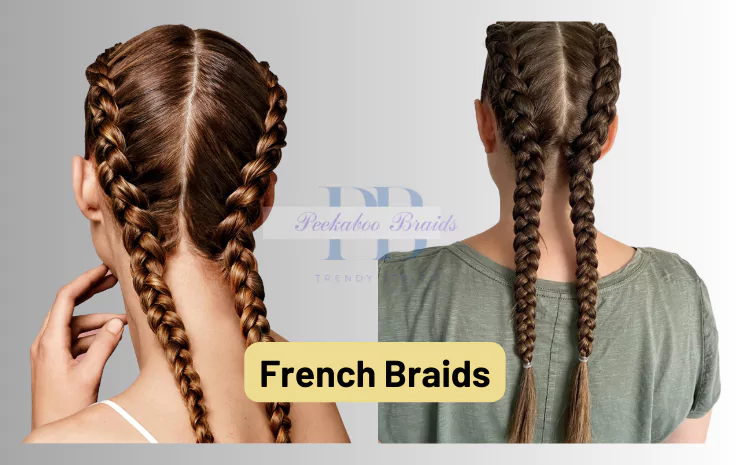
French Braids
French braids, an elegant and timeless hairstyle, weave three strands of hair intricately from the crown to the nape. Originating in Europe, these braids exude sophistication and versatility. Whether sleek for formal occasions or relaxed for casual days, French braids add a touch of grace to any look.
Step-by-Step Guide: French Braids
- Preparation: Start with clean, detangled hair. Brush through to remove knots and ensure smooth braiding.
- Sectioning: Divide a section of hair at the crown into three equal strands, holding them between your fingers.
- Initial Braid: Cross the right strand over the middle strand, then cross the left strand over the new middle strand.
- Adding Hair: As you continue braiding, add a small section of hair from the right side to the right strand before crossing it over the middle.
- Repeat on the Left: Similarly, add a small section of hair from the left side to the left strand before crossing it over the middle.
- Continuation: Alternate between adding hair to the right and left strands as you braid down the head.
- Tightness: Maintain consistent tension for a neat and secure braid. Avoid pulling too tightly to prevent discomfort.
- Incorporate All Hair: Continue incorporating hair from both sides until you reach the nape of the neck.
- Regular Braid: Once all hair is incorporated, continue with a regular three-strand braid to the ends.
- Secure: Use a hair tie or elastic band to secure the braid at the end.
Styling Tips
- Loosen for Volume: Gently pull on the edges of the braid to create a fuller and voluminous appearance.
- Messy Chic: For a relaxed look, gently tug at the strands and pancake the braid to create a soft and tousled effect.
- Accessories: Enhance your French braid with decorative clips, pins, or ribbons for added flair.
- Variations: Experiment with different starting points, such as side French braids or half-up styles.
- Braid Size: Adjust the thickness of the strands to achieve different visual effects, from delicate to bold.
- Texturizing: Apply texturizing spray before braiding to add grip and texture, making the braid easier to create and style.
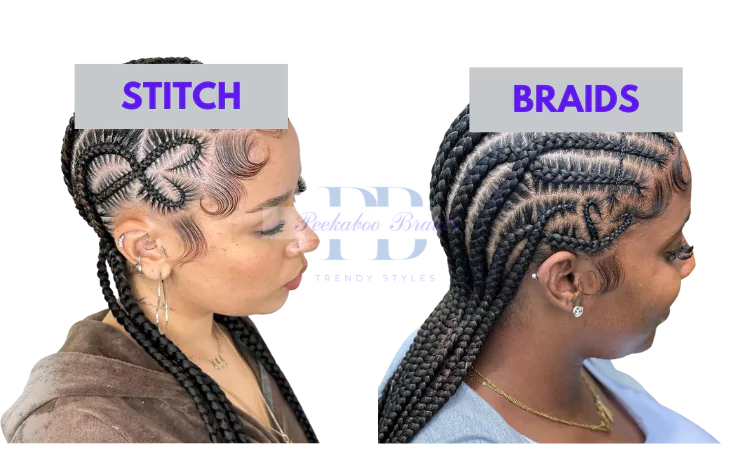
Stitch Braids
Stitch braids are a captivating hairstyle characterized by their unique fabric-like appearance. Strands are meticulously woven together, creating a structured and textured effect that resembles interlocking stitches. This method offers a polished yet creative look, making stitch braids a popular choice for those seeking an intricate and eye-catching style.
Step-by-Step Guide
- Preparation: Start with clean, detangled hair. If desired, add hair extensions for added length and volume.
- Sectioning: Divide your hair into manageable sections using clips or hair ties. Smaller sections result in more intricate stitch braids.
- Braiding Technique: Begin braiding each section by weaving three strands together. As you braid, pick up additional hair from the sides before crossing each strand over the middle.
- Stitching Effect: To achieve the stitch-like effect, alternate the direction of your braids. For example, cross the right strand under the middle, then the left strand under the middle in the next stitch.
- Tightness and Neatness: Keep your braids tight and close to the scalp for a polished look. Consistent tension ensures uniform stitches.
- Continuation: Continue stitching and weaving hair, maintaining the alternating pattern for each stitch. Incorporate additional hair from the sides as you go.
- Securing the Ends: Once you reach the desired length, secure the end of the braid with a hair tie or elastic band.
- Repeat: Repeat the process for each section, creating a pattern of intricate stitches across your scalp.
Styling Tips for Stitch Braids
- Accessorize: Embellish your stitch braids with decorative beads, cuffs, or colorful threads for a personalized touch.
- Updos and Half-Up Styles: Experiment with various updos and half-up styles that showcase the unique stitch pattern, creating a stunning focal point.
- Incorporate Colors: Add colored extensions to your stitch braids for a vibrant and eye-catching look.
- Versatile Partings: Change up your parting style to create different stitch braid patterns and angles.
- Maintenance: To keep your stitch braids looking fresh, apply a light oil to your scalp to prevent dryness and frizz.
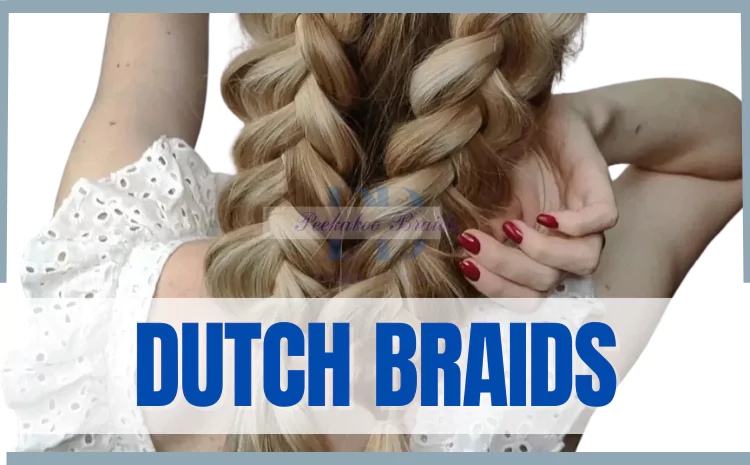
Dutch Braids
Dutch braids, also known as reverse braids, are a stylish and versatile hair option. With strands woven under one another, they create a distinctive 3D effect. Dutch braids are perfect for adding texture and elegance to any look, whether it’s a casual day out or an elegant evening event.
Step-by-Step Guide
- Preparation: Start with clean, dry hair. Brush out any tangles and apply a light styling product to add grip.
- Sectioning: Divide the hair into two equal sections, left and right. Clip one side to keep it separate while you work on the other.
- Starting the Braid: Take a small section of hair near the hairline on the unclipped side. Divide it into three strands for braiding.
- Weaving Under: Cross the right strand under the middle strand, then cross the left strand under the middle strand. This creates the initial crossover.
- Adding Hair: As you continue braiding, incorporate additional hair from the sides with each crossover. This is what creates the 3D effect.
- Consistent Weaving: Keep braiding by alternating the strands under each other and picking up hair from the sides as you go along. Maintain a steady and even tension.
- Reaching the End: Continue the Dutch braid down the back of the head, incorporating all the hair from that side. When you reach the nape of the neck, continue braiding the remaining hair without adding any more sections.
- Securing the Braid: Once you’ve braided all the way down, secure the end with a hair tie or elastic band that matches your hair color.
- Repeat on the Other Side: Unclip the other section of hair and repeat the same Dutch braid on the opposite side.
- Finishing Touches: Once both braids are complete, gently tug on the edges of the braids to create a fuller and more voluminous look. You can also pancake the braid by gently pulling apart the strands for added texture.
Styling Tips
- Messy Chic: Gently pull apart the braid’s edges for a fuller and messier appearance.
- Double Dutch: Create two Dutch braids on either side of your head for a trendy and balanced style.
- Half-Up, Half-Down: Gather the top half of your hair into Dutch braids, leaving the lower half loose for a versatile look.
- Accessorize: Add decorative pins, beads, or ribbons to your Dutch braids for a unique touch.
- Dutch Bun: Coil the ends of your Dutch braids into a bun and secure for an elegant updo.
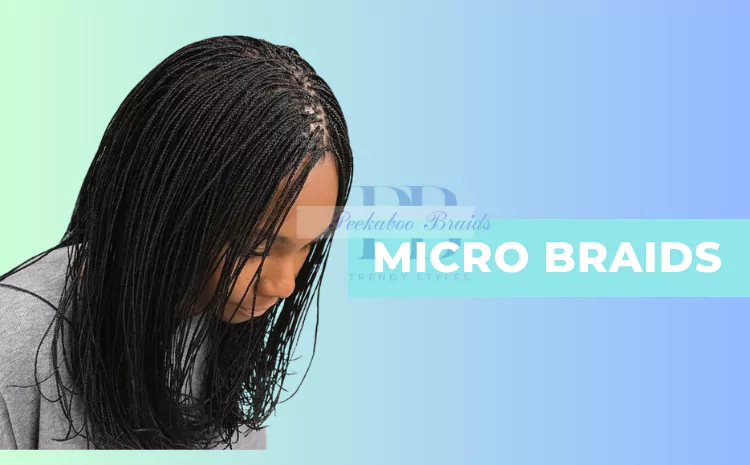
Micro Braids
Micro braids are exquisite and intricate hair creations. These tiny, finely woven braids offer a delicate and refined look, adding a touch of artistry to your style. Ideal for those seeking a graceful and detailed appearance, micro braids showcase expert craftsmanship and allow for various styling possibilities.
Step-by-Step Guide for Micro Braids
- Preparation: Start with clean, detangled hair. If using extensions, prepare them by cutting and organizing into bundles.
- Sectioning: Divide hair into small, manageable sections. Use clips to keep unbraided hair out of the way.
- Extension Attachment (optional): If using extensions, attach them to each section using a latch hook, ensuring a seamless blend.
- Braiding: Begin braiding each section, dividing into three strands. Cross the right strand over the middle, then the left over the new middle strand.
- Incorporate Extensions (optional): If using extensions, add a small piece from the extension bundle to the section before crossing strands.
- Tightness: Braid tightly to maintain neatness and longevity. Keep the braids close to the scalp for a sleek appearance.
- Consistency: Maintain consistent tension and thickness throughout each braid for a polished finish.
- Braiding Length: Continue braiding until you reach the desired length, securing with a small elastic band.
- Final Touches: Trim any excess extensions if necessary. Seal the ends with hot water or a natural oil to prevent fraying.
Styling Tips for Micro Braids
- Versatile Updos: Experiment with various updo styles, like buns, ponytails, or braided crowns, for a sophisticated look.
- Accessorize: Add beads, cuffs, or colored elastics to enhance your micro braids and showcase your personal style.
- Edges Protection: To avoid tension on your edges, consider leaving a small section of hair unbraided along the hairline.
- Maintenance: Moisturize your scalp regularly and gently wash the braids to keep them clean and fresh.
- Sleep Care: Tie your micro braids into a loose bun or wear a satin scarf to prevent frizz and maintain their shape while sleeping.
Peekaboo Braids
Peekaboo braids add an element of surprise to your hairstyle. These cleverly concealed or partially visible braids lie beneath the top layer of hair, offering a playful twist to your look. A delightful blend of subtlety and style, peekaboo braids invite intrigue and allow for creative, versatile styling options.

Step-by-Step Guide for Peekaboo Braids
- Preparation: Start with clean, dry hair. Detangle and section off the hair you want to braid.
- Sectioning: Choose the areas where you want the peekaboo braids to be. These are usually sections of hair underneath the top layer.
- Braiding: Take a small section of hair from one of the chosen areas. Begin braiding the section tightly and neatly, incorporating a 3-strand braid.
- Adding Extensions (Optional): If you desire added length or volume, incorporate hair extensions into the braid as you go.
- Secure the Ends: Once you’ve braided to your desired length, secure the end with a small hair tie or elastic band.
- Repeat: Continue this process for each chosen section, creating as many peekaboo braids as you like.
Styling Tips for Peekaboo Braids
- Accessorize: Use decorative hair cuffs, beads, or colorful elastics to embellish the ends of your peekaboo braids.
- Half-Up Style: Pull the top layer of hair into a half-up style to reveal the peekaboo braids, creating a stylish contrast.
- Updo Magic: Gather all your hair into an updo, leaving a few peekaboo braids loose for an unexpected twist.
- Braided Crown: Incorporate the peekaboo braids into a braided crown or halo for an ethereal look.
- Casual Elegance: Let some of the peekaboo braids hang loose while leaving the rest of your hair down for a casual yet sophisticated vibe.
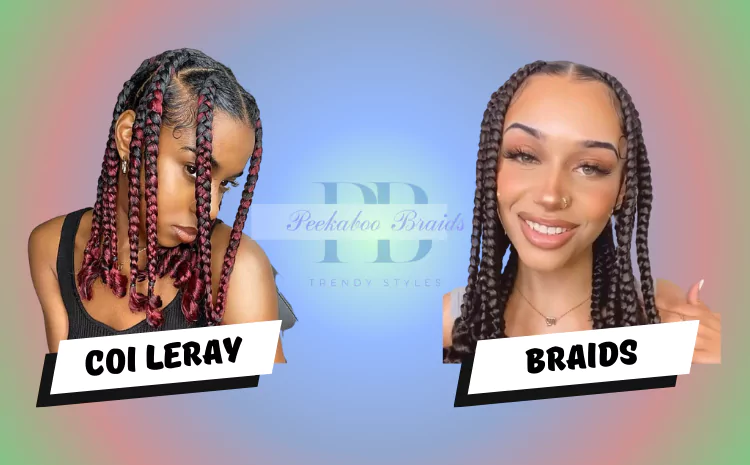
Coi Leray Braids
Coi Leray braids, echoing her bold and electric persona, feature zig-zag patterns that make a fearless statement. These dynamic and edgy braids reflect individuality, exuding a powerful energy that embodies modern urban style with a twist of uniqueness.
Step-by-Step Guide
- Sectioning: Divide your hair into rows using a rat-tail comb, creating clean and even parts.
- Preparation: Start at the back of your head. Take a small section of hair and divide it into three strands to begin the braid.
- Zig-Zag Pattern: Instead of the traditional three-strand braid, introduce a zig-zag pattern. Cross the left strand under the middle, then cross the right strand under the new middle strand.
- Adding Hair: As you continue, add small sections of hair to each strand before crossing them under. Maintain the zig-zag pattern for a distinct Coi Leray style.
- Tight Braiding: Braid tightly and neatly, keeping the zig-zag pattern consistent throughout the length.
- Securing Ends: Once you reach the desired length, secure the braid with a hair elastic.
Styling Tips
- Accessorize: Elevate your Coi Leray braids with colorful beads, cuffs, or strings. These embellishments add flair and individuality.
- Half-Up, Half-Down: Style half of your braids into a high ponytail or bun, letting the other half cascade down for a trendy and versatile look.
- Top Knot: Gather your braids into a high top knot for an edgy and attention-grabbing hairstyle.
- Hair Rings: Add small metallic rings along your braids for an urban and chic vibe.
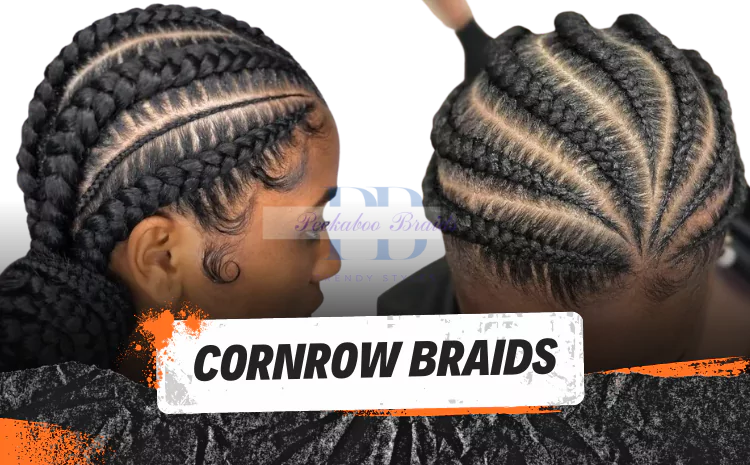
Cornrow Braids
Cornrow braids are a timeless and cultural hairstyle where hair is intricately woven close to the scalp in rows. These neat and structured rows not only showcase artistic patterns but also offer a practical and protective option, making cornrows a versatile choice for expressing style while embracing heritage.
Step-by-Step Guide
- Prepare and Section: Start with clean, detangled hair. Divide the hair into sections using a tail comb, creating the desired pattern for your cornrows.
- Moisturize and Protect: Apply a leave-in conditioner or hair oil to keep the scalp moisturized and protected during braiding.
- Start Braiding: Begin at the front of the head. Take a small section of hair and divide it into three equal parts. Cross the right strand under the middle strand, then cross the left strand under the middle strand.
- Add Hair: As you continue braiding, add small sections of hair from each side into the braid. This is the key to the cornrow’s distinct close-to-the-scalp appearance.
- Maintain Tension: Keep the tension even to ensure neat and uniform braids. Braid tightly enough to keep the style secure but not too tight to cause discomfort.
- Continue Braiding: As you braid, keep adding hair from each side and crossing under the middle strand. Work your way along the scalp, creating a continuous row.
- Complete and Secure: Once you’ve reached the desired length, continue braiding without adding hair, then secure the end with a hair elastic or clip.
- Repeat: Repeat the process for each section, following your pattern, until all desired rows are complete.
Styling Tips
- Versatile Designs: Experiment with various cornrow patterns, from simple straight lines to intricate geometric shapes, to suit your style and creativity.
- Extensions and Accessories: Incorporate extensions for added length and styling options. Enhance your cornrows with beads, cuffs, or hair jewelry.
- Protective Style: Cornrows offer protection to your natural hair, making them an excellent choice for minimizing damage and promoting hair growth.
- Maintenance: To maintain your cornrows, wrap your hair with a silk or satin scarf before bed, avoid excessive pulling or tension, and moisturize the scalp regularly.
Viking Braids
Viking braids, inspired by Norse heritage, conjure images of fierce warriors and legendary tales. These symmetrical, twin braids exude strength and resilience, weaving a sense of history into modern style. Embrace your inner shieldmaiden with this bold and iconic look that stands the test of time.
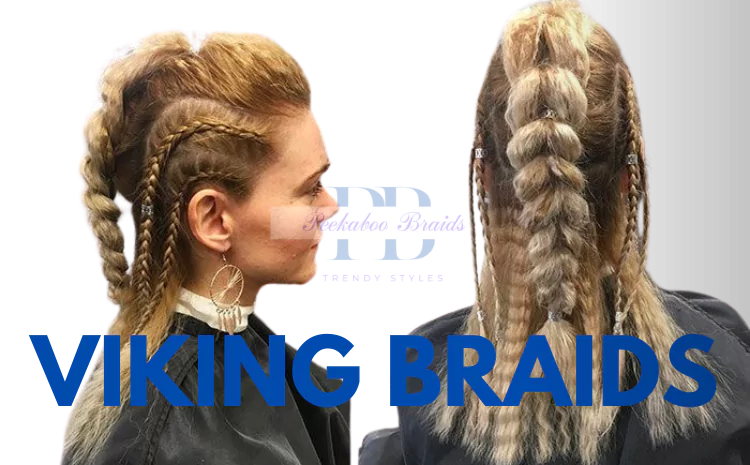
Step-by-Step Guide
- Sectioning: Part your hair down the middle, creating two equal sections from the forehead to the nape of your neck.
- Preparation: Brush and detangle each section to ensure smooth braiding.
- Braiding: Start a regular three-strand braid on one side. Cross the right strand over the middle, then the left strand over the middle.
- Adding Hair: As you continue braiding, incorporate small sections of hair from the sides into each strand before crossing them over the middle. This creates the intricate, woven effect.
- Symmetry: Repeat the braiding process on the other side, mirroring the same pattern and incorporating hair as you go along.
- Secure Ends: Once both braids are complete, secure the ends with elastic bands or hair ties.
Styling Tips
- Texture: For added texture and volume, gently pull on the edges of the braids to loosen them slightly.
- Accessories: Decorate your Viking braids with beads, cuffs, or small metal rings for an authentic warrior-inspired look.
- Variation: Experiment with different braid thicknesses, from chunky to more delicate, to find the style that best suits you.
- Half-Up Option: Gather the braids into a half-up ponytail or bun for a versatile and polished style.
Jumbo Braids
Jumbo braids are a bold and attention-grabbing hairstyle characterized by their large size and statement-making appearance. These thick braids create a dramatic and eye-catching look, allowing for a variety of styling options, from classic updos to trendy half-up styles. Jumbo braids offer a confident and fashion-forward expression of individuality.
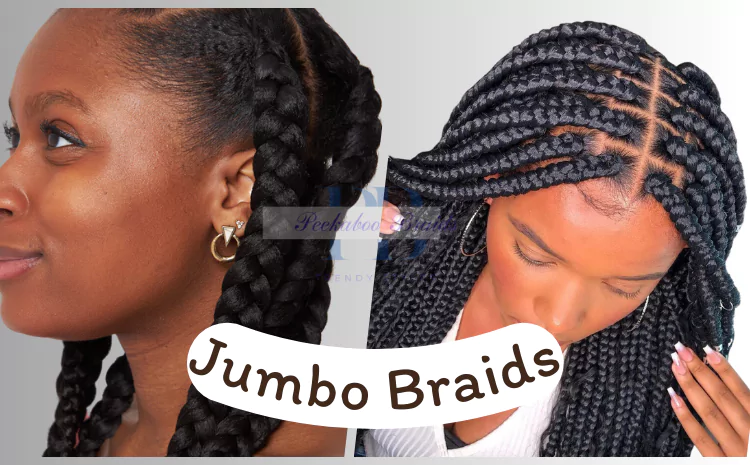
Step-by-Step Guide
- Preparation: Start with clean, detangled hair. Divide your hair into sections for manageable braiding.
- Extension Selection: Choose jumbo braid extensions in your desired color and length.
- Sectioning: Take a small section of your natural hair and attach the extension using the “feed-in” method.
- Braiding: Divide the section into three parts and begin braiding, incorporating the extension hair as you go.
- Tightness: Braid tightly for a neat look, but avoid excessive tension to prevent discomfort.
- Length: Continue braiding until you reach your desired length, leaving a bit of extension hair at the end.
- Sealing: Secure the end of the braid with a hair tie or elastic band.
- Repeat: Repeat the process for each section of hair, ensuring consistency in size and tightness.
- Styling: Style the jumbo braids as desired, such as ponytails, buns, or half-up styles.
Styling Tips
- Accessorize: Enhance your jumbo braids with beads, cuffs, or colorful strings for a personalized touch.
- Updos: Experiment with different updo styles using your jumbo braids to keep them versatile.
- Half-Up Styles: Gather some of the braids into a half-up style to add dimension and flair.
- Protective Care: Apply a lightweight oil to your scalp and braids to maintain moisture and prevent frizz.
- Sleeping: Tie your braids with a satin scarf or use a satin pillowcase to protect them while sleeping.
- Washing: Cleanse your scalp with a diluted shampoo and focus on the roots, then air-dry or use a low-heat dryer.
- Maintenance: Re-braid any loose or frizzy sections to keep your jumbo braids looking fresh.
- Duration: Keep your jumbo braids in for 4-6 weeks to prevent tension on your hair and scalp.
Butterfly Braids
Butterfly braids are enchantingly intricate hairstyles that weave strands into delicate loops, resembling the wings of a butterfly. These whimsical and unique braids add an ethereal touch to your look, combining artistry and style in a captivating and graceful manner. Perfect for those seeking a truly eye-catching and magical hairstyle.
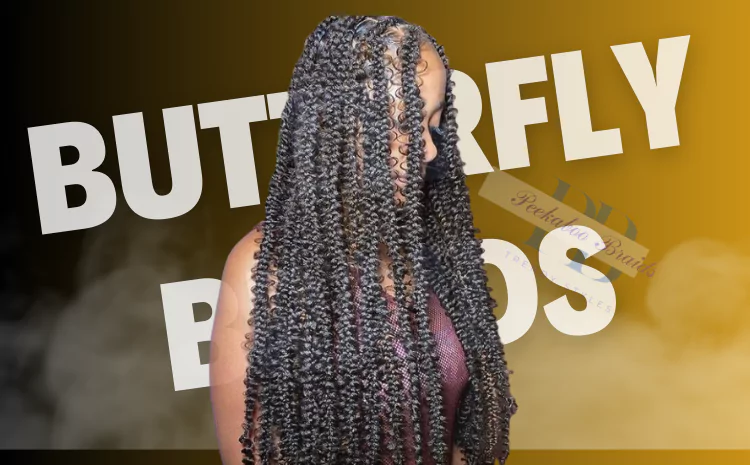
Step-by-Step Guide
- Preparation: Start with clean, detangled hair. Apply a leave-in conditioner for added manageability.
- Sectioning: Part hair into sections. Create a middle part from the forehead to the nape, then divide each side into two.
- Braiding Base: Begin braiding each section using a three-strand technique. Braid halfway down, securing with small elastics.
- Looping: Take the remaining hair and create loops, twisting them around the base of each braid to resemble butterfly wings.
- Securing: Use bobby pins to secure the loops in place, allowing them to gracefully cascade down the sides.
- Finishing Touch: Gently pull and adjust loops to achieve the desired butterfly shape.
Styling Tips
- Extensions: Add extensions for longer loops and extra drama.
- Accessorize: Decorate with beads, cuffs, or ribbons for a unique touch.
- Half-Up Variation: Gather the braids into a half-up style, showcasing the butterfly effect.
- Loose vs. Tight: Adjust loop tension for a loose and whimsical or tight and defined look.
- Natural Hair: Experiment with your natural hair color for a subtle butterfly effect.
Jayda Wayda Braids
Jayda Wayda braids are a reflection of urban elegance and trendsetting style. Long, sleek, and meticulously crafted, they embody the essence of modern chic. Inspired by the social media influencer, these braids exude confidence, making a statement that’s both edgy and sophisticated. A true ode to contemporary fashion.
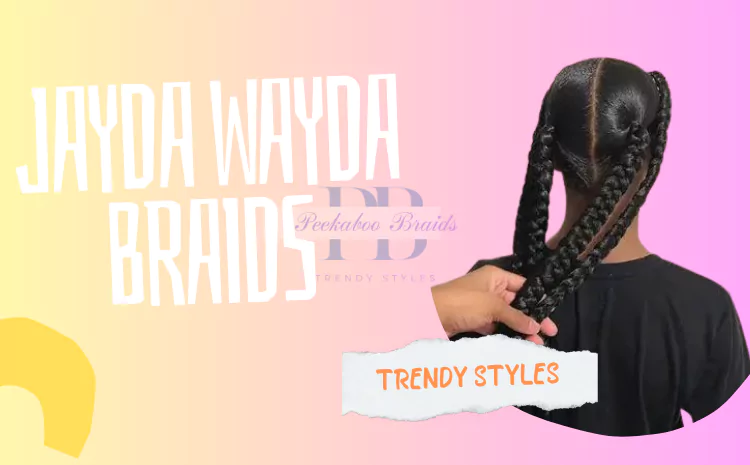
Step-by-Step Guide
- Preparation: Start with clean, detangled hair. Divide hair into sections for manageable braiding.
- Extension Selection: Choose high-quality hair extensions in your preferred length and color.
- Cornrow Foundation: Begin cornrowing small sections close to the scalp. These will serve as the base for your braids.
- Adding Extensions: Attach extensions to the cornrows using the braiding technique of your choice. Ensure a secure and seamless blend.
- Braiding Process: Divide extensions into three equal sections. Cross the right strand over the center, then the left over the center, repeating until you reach the ends.
- Tight and Neat: Braid tightly and neatly for a polished finish. Maintain consistent tension to prevent frizz.
- Securing Ends: Seal the ends of the braids using hot water or a preferred method to prevent unraveling.
Styling Tips
- Sleek Updos: Transform your braids into elegant updos, ponytails, or buns for a sophisticated look.
- Accessories: Add hair cuffs, beads, or decorative accessories to enhance your braids and showcase your personal style.
- Versatile Parting: Experiment with different parting styles – middle, side, zig-zag – for diverse looks.
- Edge Control: Maintain smooth edges by applying edge control or gel to the hairline.
- Protective Care: Keep your braids clean by gently washing them and moisturizing your scalp. Use a satin scarf or bonnet to prevent frizz while sleeping.
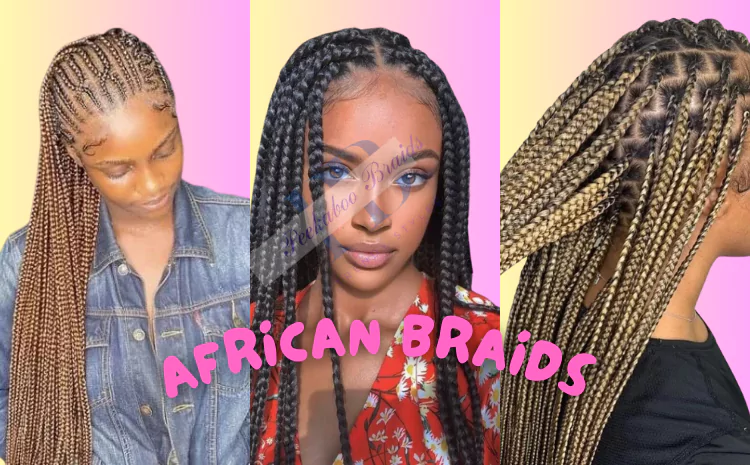
African Braids
African braids encapsulate the rich cultural tapestry of the continent, intertwining tradition and artistry. These bold and intricate styles, originating from diverse African cultures, showcase a deep connection to heritage. Each braid carries a story, celebrating unity, history, and the vibrant beauty of Africa’s people and their enduring traditions.
Step-by-Step Guide
- Prepare Hair: Start with clean, detangled hair. Optionally, apply a leave-in conditioner for added moisture.
- Section Hair: Divide hair into small sections using a comb. Clip or tie back the sections you’re not working on.
- Cornrow Base: Create a neat cornrow base by weaving three strands of hair close to the scalp. Start at the front and work your way towards the back.
- Add Extensions: For length and thickness, incorporate synthetic or human hair extensions. Attach the extensions to the cornrow base using a braiding technique.
- Braid Formation: Begin braiding the extensions along with the natural hair, maintaining tension for a secure grip. Braid tightly and consistently.
- Length and Design: Braid to your desired length. Experiment with different patterns, designs, and partings for a unique look.
- Secure Ends: Secure the ends with a hair tie or sealing the braids with hot water, depending on the braiding technique used.
Styling Tips
- Maintenance: Moisturize the scalp and braids regularly to prevent dryness.
- Edge Control: Apply edge control gel to keep baby hairs sleek and neat.
- Sleep Care: Protect braids at night with a silk or satin scarf or bonnet.
- Accessorize: Add beads, cuffs, or hairpins for a personalized touch.
- Versatility: Experiment with updos, ponytails, or half-up styles to change your look.
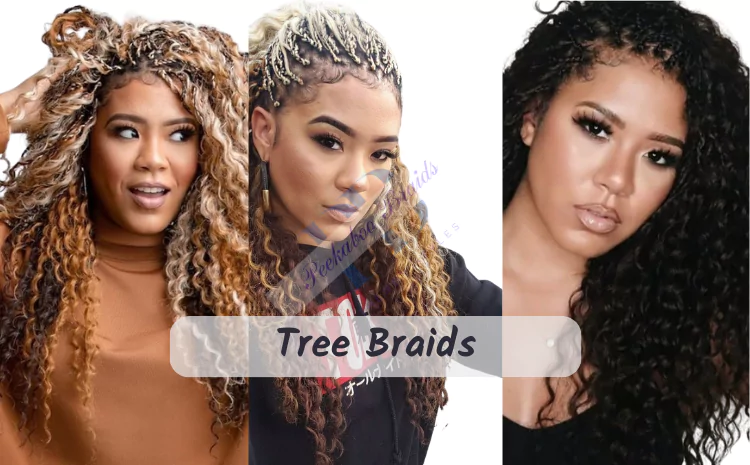
Tree Braids
Tree braids are a unique and versatile hair extension technique. Cornrows serve as the base, with extensions looped through for a natural, flowing appearance. They offer a seamless blend of your hair and extensions, providing length and volume while allowing for various styling options. Tree braids are perfect for those seeking a low-maintenance yet stunning look.
Step-by-Step Guide
- Prepare Your Hair: Wash and condition your hair, ensuring it’s clean and free of tangles. Allow it to dry completely before starting.
- Cornrow Base: Part your hair into small sections and create cornrows close to the scalp. These will serve as the foundation for attaching the extensions.
- Select Extensions: Choose high-quality hair extensions that match your natural hair color and desired length. Synthetic or human hair extensions can be used.
- Looping Extensions: Take a small section of the extensions and loop them through a cornrow using a latch hook tool. Continue looping until the entire row is covered.
- Continue Rows: Work row by row, looping extensions through each cornrow until your entire head is covered. Be careful not to pull too tightly to avoid discomfort.
- Blend and Style: Gently comb through your natural hair to blend it with the extensions. Style your tree braids as desired, such as leaving them loose, creating updos, or pulling them into a ponytail.
Styling Tips for Tree Braids
- Maintenance: Moisturize your scalp regularly and avoid excessive tension to maintain the health of your hair and the longevity of the style.
- Styling Versatility: Tree braids offer numerous styling options. Experiment with half-up styles, buns, ponytails, and more.
- Accessorize: Add beads, cuffs, or ribbons to enhance your tree braids and personalize your look.
- Night Care: Tie your hair with a satin scarf before sleeping to prevent friction and maintain the braids’ neatness.
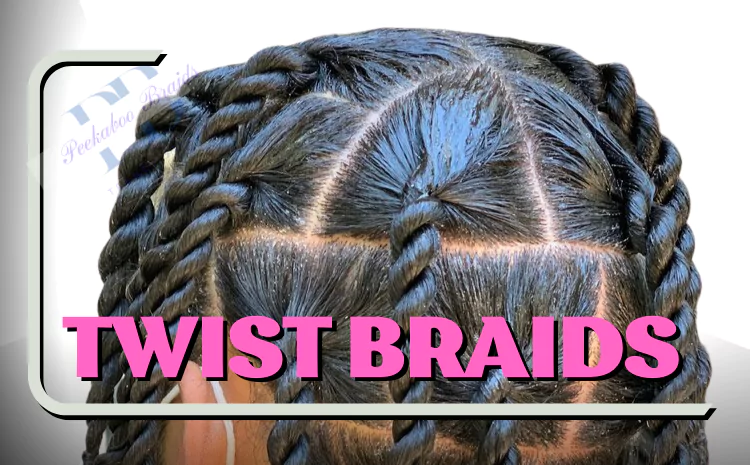
Twist Braids
Twist braids intertwine two strands of hair elegantly, creating a timeless and textured look. Versatile and stylish, they suit various occasions, from casual to formal. Whether you choose thin or chunky twists, this braided style adds depth and sophistication to your hair, embracing a touch of classic charm.
Step-by-Step Guide for Twist Braids
- Preparation: Start with clean, dry hair. Detangle and section your hair into manageable parts.
- Hair Product: Apply a lightweight leave-in conditioner or hair oil to each section for added moisture and manageability.
- Strand Selection: Choose two equal-sized strands of hair from a section to begin the twisting process.
- Twist Initiation: Cross the right strand over the left strand, then twist both strands away from your face. Maintain tension for a neat twist.
- Twist Progression: Continue twisting the strands while adding a bit of hair from the outer sections to each strand with every twist.
- Uniformity: Keep the twists consistent in size and tightness throughout your hair.
- Sealing: Once you reach the end of a twist, secure it with a small hair elastic or a coated rubber band.
- Extensions (optional): If desired, add hair extensions for extra length and thickness, incorporating them into the twisting process.
- Repeat: Repeat steps 3-8 for all sections of your hair, working your way from one side of your head to the other.
- Final Touches: Gently tug on the twists to create a more voluminous and natural look.
Styling Tips for Twist Braids
- Maintenance: To prevent frizz, apply a lightweight oil or serum to your twists regularly.
- Sleeping: Protect your twists by wearing a satin or silk bonnet or using a satin pillowcase.
- Accessorize: Add decorative beads, cuffs, or hairpins to individual twists for a unique touch.
- Updos: Experiment with various updo styles like buns, ponytails, or half-up/half-down looks using your twist braids.
- Versatility: Twist braids can last for several weeks, allowing you to explore different hairstyles.
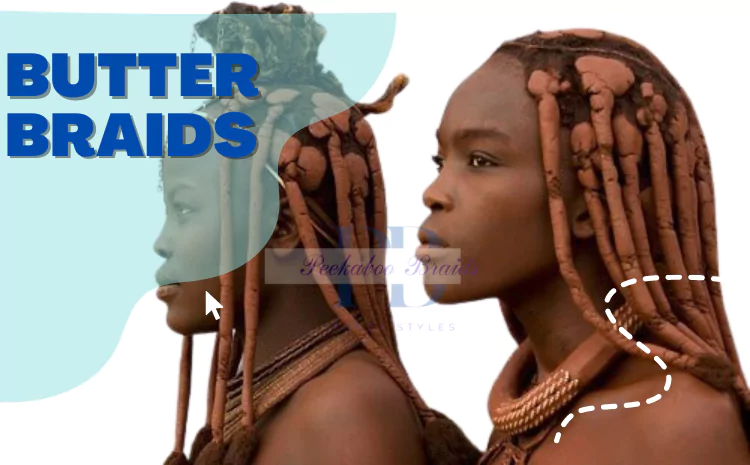
Butter Braids
Butter Braids are sleek and flat twists that elegantly hug the scalp, offering a refined and polished appearance. These braids showcase intricate styling while maintaining a neat and sophisticated look. Ideal for those seeking a combination of texture and sophistication in their hair.
Step-by-Step Tutorial for Butter Braids
- Preparation: Start with clean, detangled hair. Gather necessary tools: rat-tail comb, hair clips, hair ties, and styling product if desired.
- Sectioning: Part your hair into sections according to your desired braiding pattern. Use the rat-tail comb for precision.
- Prepping the Hair: Apply a light styling product for hold and smoothness. This helps to prevent frizz and keep the braids sleek.
- Dividing Sections: Take a small section of hair at the starting point. Divide it into two equal strands.
- Twisting: Cross the right strand over the left strand, twisting them once.
- Adding Hair: As you continue, add a small amount of hair from the scalp to the right strand before crossing it over the left strand.
- Tight Braiding: Continue this twisting and adding hair process while keeping the braids flat against the scalp. Braid tightly for a polished look.
- Repeat: Repeat steps 4 to 7 along the desired braiding path, following the contour of your head.
- Secure the End: Once you reach the desired length, secure the braid with a hair tie. If desired, add a decorative cuff or bead.
Styling Tips for Butter Braids
- Sleek Elegance: Butter braids shine when they’re sleek and close to the scalp. Ensure even tension while braiding for a polished finish.
- Accessorize: Elevate the style by adding beads, cuffs, or even colored elastics to enhance the look and express your personal style.
- Versatility: Experiment with parting patterns and placement for different looks. Side-swept or center-parted, the choice is yours.
- Maintenance: To prolong your butter braid style, wrap your hair with a silk or satin scarf before sleeping to minimize frizz and maintain the sleekness.
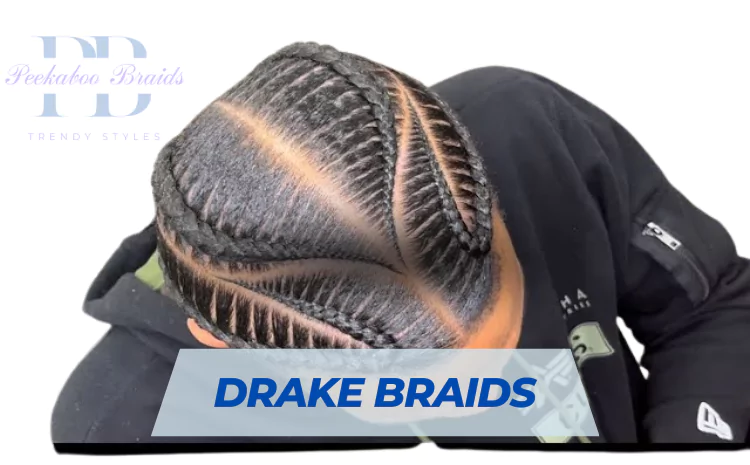
Drake Braids
Drake braids, influenced by the rapper himself, exude contemporary coolness with clean, well-defined cornrows. This urban-inspired style adds a trendy edge to your look, capturing the essence of modern urban fashion and music culture. Perfect for those seeking a sleek and stylish hairdo that makes a statement.
Step-by-Step Tutorial for Drake Braids
- Preparation: Start with clean, dry hair. Detangle and section your hair into neat rows using a rat-tail comb.
- Cornrow Pattern: Choose a cornrow pattern that suits your style, such as straight-back or zig-zag. Begin the first cornrow at the front and braid tightly along the scalp.
- Extension Attachment: For added length and thickness, consider using hair extensions. Attach them securely as you braid, blending them seamlessly into your natural hair.
- Braiding Technique: Continue braiding each row tightly and neatly, following your chosen pattern. Use a firm yet gentle grip to ensure durability and minimize tension on your scalp.
- Consistency: Maintain a consistent size and tension for each cornrow, ensuring a polished and uniform appearance.
- End Securing: Secure the end of each cornrow with a small, snag-free hair tie or rubber band.
- Finishing Touches: If desired, customize your Drake braids with decorative beads, cuffs, or hairpins.
Styling Tips for Drake Braids
- Sleek and Chic: Embrace the sleekness of Drake braids by opting for a glossy finish. Use a light hair oil or shine spray to add a polished touch.
- Pompadour Ponytail: Gather the braids into a high ponytail at the crown, leaving some braids loose at the front for a modern pompadour effect.
- Side Swept: Sweep the braids to one side and secure with a hairpin or accessory, creating an asymmetrical and fashionable look.
- Top Knot Bun: Gather the braids into a high bun at the top of your head, elevating your style and emphasizing the clean lines of the braids.
- Durag Wrap: Before bedtime, wrap your Drake braids in a durag to maintain their shape and protect them while you sleep.
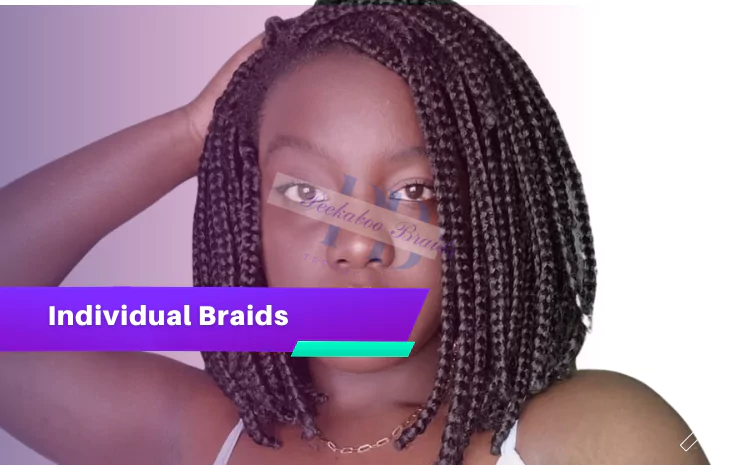
Individual Braids
Individual braids are small, delicate strands of hair intricately woven to create a stunning, unique look. Each braid stands alone, allowing for artistic expression and versatile styling. Perfect for showcasing individuality, these braids offer a personalized touch and endless possibilities for creativity in hair design.
Step-by-Step Guide
- Preparation: Wash and condition your hair. Detangle thoroughly to ensure smooth braiding.
- Sectioning: Part your hair into manageable sections using clips. Create small subsections for each individual braid.
- Extension Attachment (optional): If desired, attach synthetic hair extensions to each subsection. Fold the extension in half and loop it through the natural hair, then braid together.
- Braiding: Divide the subsection into three equal strands. Cross the right strand over the middle, then the left over the middle. Begin incorporating additional hair from the roots as you braid.
- Tight and Neat: Keep the tension even as you braid. A consistent tension ensures neat and uniform braids.
- Length and Ends: Continue braiding until you reach your desired length. Secure the end with a small elastic band or a hair tie.
- Finishing: Repeat the process on all sections, creating individual braids. Trim any excess extensions if used.
Styling Tips for Individual Braids
- Accessorize: Enhance your individual braids with beads, cuffs, or wraps for added style and flair.
- Versatile Updos: Experiment with different updo styles, like buns or ponytails, to showcase your braids in unique ways.
- Color Play: Incorporate colored extensions for a pop of vibrant color throughout your braided look.
- Edgy or Boho: Style individual braids to match your vibe—go edgy with tight, sleek braids, or embrace a boho look with looser, carefree braids.
- Scalp Care: Keep your scalp moisturized to prevent dryness and itching. Consider using a lightweight oil or leave-in conditioner.
ASAP Rocky Braids
ASAP Rocky Braids exude urban coolness with clean, sleek cornrows. Inspired by the rapper’s signature style, they offer an edgy and trendy appearance. These braids are a bold statement, combining modern flair with cultural influence, perfect for those seeking a fashionable and confident look.

Step-by-Step Guide
- Preparation: Start with clean and detangled hair. Part your hair into neat sections, depending on the desired cornrow pattern.
- Sectioning: Divide each section into smaller rows, using a rattail comb. The size of the rows will determine the thickness of your braids.
- Braiding: Begin at the front and select a row to start braiding. Take a small section at the hairline, divide it into three strands, and start braiding in a neat, tight pattern.
- Incorporating Extensions: If desired, incorporate hair extensions for added length. Attach the extension hair at the base of your natural hair and braid as usual.
- Braid Structure: As you continue braiding, add more hair from the row you’re working on to each strand before crossing them over. Maintain consistent tension for clean and uniform braids.
- Repeat and Secure: Continue braiding row by row until you’ve completed the desired pattern. Secure each braid with a small hair elastic or rubber band.
Styling Tips
- Sleek Finish: To achieve ASAP Rocky’s signature sleek look, use edge control or gel to smooth down any flyaways along the hairline.
- Accessorize: Elevate your braids with stylish hair cuffs, beads, or colored strings for a unique touch.
- Versatile Styling: Experiment with different ways to style your braids – from wearing them down to tying them into a high ponytail or bun.
- Maintenance: Keep your braids looking fresh by regularly moisturizing your scalp and edges. Consider using a lightweight oil to nourish your hair.
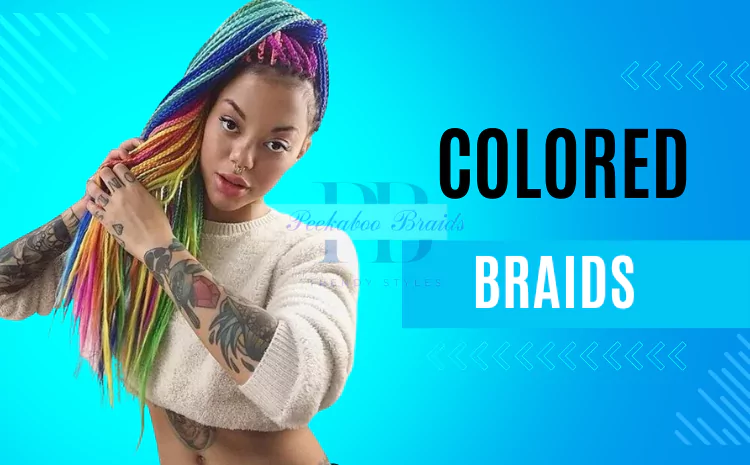
Colored Braids
Colored braids infuse vibrant hues into traditional styling, creating a captivating visual tapestry. With a playful and artistic flair, these braids allow self-expression to flourish, as each strand weaves a personalized story of individuality and creativity. Embrace the spectrum of colors and embrace the joy of bold and vivacious looks.
Step-by-Step Guide
- Prepare Extensions: Select high-quality hair extensions in your desired colors. Ensure they match your hair texture for a seamless blend.
- Section and Divide: Part your hair into manageable sections. Divide each section into smaller subsections for braiding.
- Apply Extensions: Take a small section of natural hair and an extension strand. Attach the extension to your natural hair using a braiding technique of your choice.
- Braid and Repeat: Begin braiding, incorporating the extension strand into your natural hair. Continue braiding until you reach the desired length.
- Add More Colors: To create a vibrant effect, alternate between different colored extensions as you braid. Experiment with patterns and combinations.
- Secure Ends: Once the braid is complete, secure the ends with a hair tie or elastic band. Gently tug on the braid to create a slightly relaxed look.
Styling Tips
- Play with Patterns: Experiment with various braid patterns to showcase the colors. Try diagonal, fishtail, or even criss-cross designs.
- Accessorize: Add beads, cuffs, or threads that complement the colors for an extra pop of style.
- Half-Up Styles: Create half-up hairstyles, gathering some braids into a top knot or bun, allowing the colors to shine through.
- Color Placement: Strategically place different colors for a gradient or ombre effect. This adds depth and dimension to your look.
- Contrast with Outfits: Coordinate your outfits to accentuate the colors in your braids. Embrace the opportunity to create eye-catching ensembles.
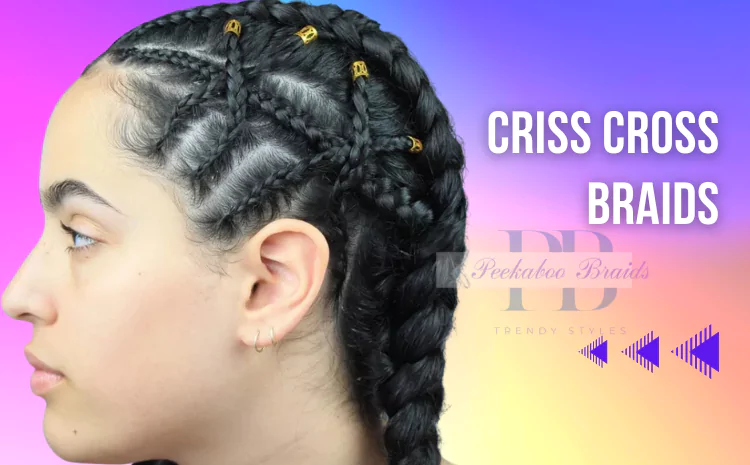
Criss Cross Braids
Criss Cross Braids weave a captivating tale of intricacy, as strands intertwine in an elegant dance. The unique criss-cross pattern adds depth and texture, transforming hair into a mesmerizing work of art. These braids offer a bold and stylish statement, turning heads with their enchanting and eye-catching design.
Step-by-Step Guide
- Preparation: Start with clean and detangled hair. Part the hair into sections as desired.
- Sectioning: Divide a small section of hair at the top into two equal parts, creating the base for the criss-cross.
- First Cross: Take the right section and cross it over the left section, as you would in a regular braid.
- Weaving: While holding the crossed sections, pick up a small strand of hair from the outside of the left section and add it to the right section. Cross the right section over the left section again.
- Second Cross: Now, take the left section and cross it over the right section.
- Weaving: Pick up a small strand from the outside of the right section and add it to the left section. Cross the left section over the right section again.
- Repeat: Continue alternating between right and left crosses, incorporating new strands of hair as you go along.
- Secure the End: Once you reach the desired length, secure the braid with an elastic band.
Styling Tips
- Textured Look: Gently tug at the edges of the braids to create a fuller and textured appearance.
- Accessories: Embellish the criss-cross braids with decorative beads, cuffs, or hairpins for added flair.
- Half-Up Style: Gather some of the braids into a half-up ponytail or bun, leaving the rest cascading down.
- Messy Chic: Loosen the braids slightly for a relaxed and effortless vibe.
- Color Play: Experiment with colored extensions to enhance the visual impact of the criss-cross pattern.
Ghana Braids
Ghana Braids, a tribute to African heritage, showcase bold and chunky cornrows, intricately woven close to the scalp. With a rich cultural significance, these braids exude confidence and pride, making a striking statement of style and tradition. Ideal for both everyday wear and special occasions, Ghana Braids celebrate beauty and heritage.

Step-by-Step Guide
- Preparation: Wash and condition your hair. Detangle it to remove knots and ensure smooth braiding.
- Sectioning: Divide your hair into rows or sections using a rat-tail comb. The number of sections depends on the desired thickness of the braids.
- Cornrowing: Begin with the first section. Part a small segment at the front, divide it into three strands, and start cornrowing by weaving the strands under one another.
- Adding Hair: As you continue cornrowing, incorporate additional hair from the scalp with each pass to create the classic Ghana Braids pattern.
- Braiding Pattern: Maintain a consistent braiding pattern as you work your way down the section. The braids should be tight and neat against the scalp.
- Extension Addition (Optional): If desired, you can add extensions to each braid for length and thickness.
- Secure Ends: When you reach the end of a braid, secure it with a small hair elastic or wrap the end with braiding hair.
- Repeat: Continue the process for each section until all desired braids are complete.
- Styling: Ghana Braids can be worn down, styled into updos, or gathered into ponytails.
Styling Tips for Ghana Braids
- Scalp Care: Keep your scalp clean and moisturized to maintain healthy hair and prevent dryness.
- Edges: Be gentle with your edges to avoid unnecessary tension and protect your hairline.
- Accessories: Decorate your braids with beads, cuffs, or other accessories for added flair.
- Versatility: Experiment with different styles, such as half-up, half-down, or bun variations, to switch up your look.
- Night Routine: Protect your braids at night by wrapping them with a satin scarf or using a satin pillowcase to reduce friction.
- Maintenance: Regularly moisturize your scalp and refresh your braids by applying a lightweight leave-in conditioner.
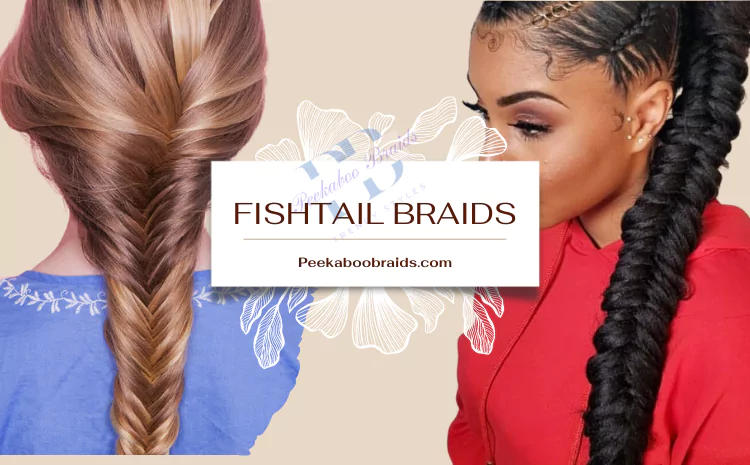
Fishtail Braids
Fishtail braids offer a captivating twist on traditional braiding, creating a stunning textured pattern resembling a fishtail. By intertwining two strands of hair in an intricate manner, this style exudes a charming and elegant look, perfect for both casual outings and special occasions.
Step-by-Step Guide
- Prepare Your Hair: Brush and detangle your hair to ensure a smooth base. Fishtail braids work best on clean, dry hair.
- Divide into Two Sections: Split your hair into two equal sections, holding one in each hand.
- Start Braiding: Take a small strand from the outer edge of the left section and cross it over to the right section.
- Repeat on the Right Side: Now, take a small strand from the outer edge of the right section and cross it over to the left section.
- Continue Alternating: Keep alternating between the left and right sides, crossing small strands over to the opposite section. Pull the strands tight to create a defined fishtail pattern.
- Add Hair (Optional): For a sleeker look, add a small strand of hair from the outside of one section before crossing it over to the other section.
- Secure the End: When you reach the desired length, secure the end of the braid with a clear elastic band or a decorative hair tie.
Styling Tips
- Loosen the Braid: Gently pull on the edges of the braid to loosen and widen the fishtail pattern, creating a fuller and more textured appearance.
- Messy Fishtail: For a relaxed and effortless look, intentionally pull out a few strands from the braid to achieve a messy fishtail effect.
- Half-Up Fishtail Bun: Gather the top half of your hair into a high ponytail, fishtail braid the ponytail, and secure the end. Then, wrap the braid around the base of the ponytail to create a chic half-up fishtail bun.
- Side Fishtail: Create a side fishtail braid by starting the braid from one side of your head, either above the ear or at the nape of your neck.
- Accessorize: Embellish your fishtail braid with decorative pins, beads, or ribbons to add a personal touch.
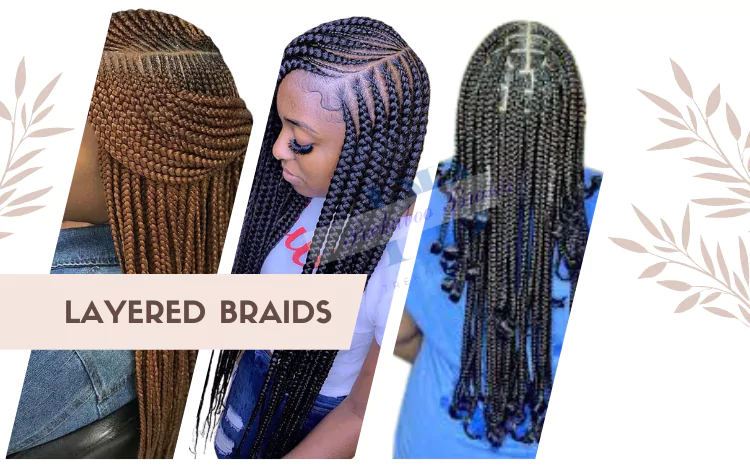
Layered Braids
Layered braids offer a captivating twist to traditional styles. With strands stacked in dimensional patterns, these braids create depth and texture, making your hair a work of art. Whether elegantly cascading or intricately woven, layered braids add a touch of drama and sophistication to your look.
Step-by-Step Guide
- Preparation: Start with clean, detangled hair. Divide the hair into sections based on the desired braid placement.
- Sectioning: Create a parting to separate the top layer of hair from the bottom layer. Clip the top layer of hair away to keep it separate.
- Bottom Layer Braiding:
- Take a small section of hair from the bottom layer.
- Begin braiding the section tightly and neatly.
- Braid down the length of the section, securing the end with an elastic band.
- Top Layer Braiding:
- Unclip the top layer of hair.
- Take a small section of hair from the top layer, including some hair from the bottom layer braid.
- Begin braiding this section, incorporating the bottom layer braid into the new braid.
- Braid down the length of the section and secure the end.
- Repeat and Layer: Continue braiding sections from the top layer, incorporating the previous braids as you go along. Layer the braids in a staggered pattern for a dimensional effect.
- Secure and Finish: Once all sections are braided, secure the ends with elastic bands. Gently tug on the edges of the braids to create a slightly undone look for added texture.
Styling Tips
- Accessories: Add beads, cuffs, or colored elastics to accentuate the layered effect and enhance the overall look.
- Messy Chic: Loosen some strands and gently pull apart the braids for a relaxed and boho-chic appearance.
- Half-Up Style: Gather the top layer of braids into a half-up style, leaving the bottom layer loose for a stylish contrast.
- Texturizing Spray: Apply texturizing spray or hair wax to the braids to create a lived-in, effortless vibe.
- Formal Elegance: Incorporate layered braids into an updo for a sophisticated and intricate hairstyle perfect for formal events.
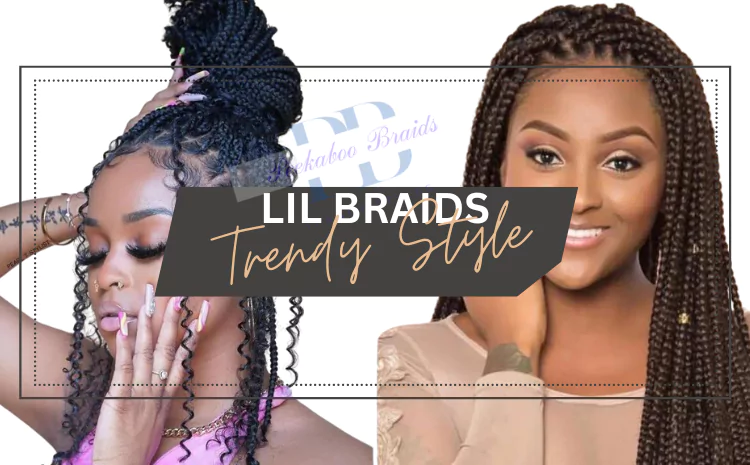
Lil Braids
Lil braids, also known as mini braids, bring a touch of whimsy and charm to your look. These dainty braids may be small in size, but they make a big impact with their delicate and intricate style. Whether woven throughout your hair or used to accentuate a larger style, lil braids add a playful and distinctive flair.
Step-by-Step Guide
- Preparation: Start with clean and detangled hair. Divide your hair into manageable sections.
- Sectioning: Choose the areas where you want to add lil braids. These can be scattered throughout or focused on specific parts.
- Braiding: Take a small section of hair and divide it into three strands. Begin braiding by crossing the right strand over the middle, then the left strand over the new middle strand.
- Incorporating Hair: As you continue braiding, add a tiny amount of hair from the surrounding area to each strand before crossing them over. This creates the woven effect.
- Tightness: Braid tightly but not too tightly to avoid discomfort or stress on the hair.
- Length: Braid to your desired length and secure the end with a small, clear elastic band or a hair-friendly tie.
Styling Tips
- Accentuate Hairstyles: Use lil braids to accentuate other styles, such as ponytails, buns, or half-up looks.
- Accessories: Add colorful or decorative beads, cuffs, or ribbons to your lil braids for a personalized touch.
- Mix and Match: Combine lil braids with other braiding techniques to create unique textures and patterns.
- Versatility: Lil braids work well on various hair types and lengths, making them versatile for different looks.
- Casual or Formal: Lil braids can be casual for everyday styles or dressed up for special occasions.
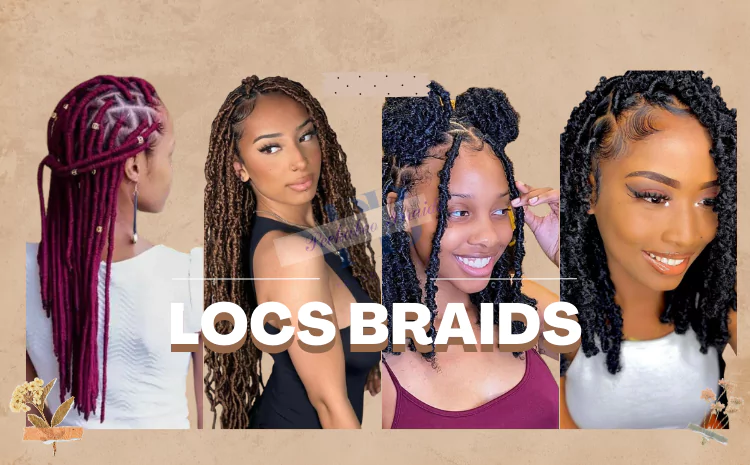
Locs Braids
Locs braids blend structured braiding with the essence of traditional dreadlocks. These artistic braids provide a unique fusion, offering a versatile and captivating style that pays homage to both heritage and modern expression. With intricate patterns, locs braids exude a confident and culturally rich aesthetic.
Step-by-Step Guide
- Prepare Your Hair: Start with clean, dry hair. Detangle and part your hair into sections using a comb.
- Create Cornrows: Begin by creating cornrows as your base. Part a small section at the front and start braiding close to the scalp. Continue adding hair as you braid along the row.
- Attach Extensions: Using extensions of your choice, loop and secure them onto the cornrows using a latch hook. Ensure a secure attachment for longevity.
- Braid the Extensions: Begin braiding the extensions along with your natural hair, incorporating the extensions into the braid as you go.
- Braid Tightly and Neatly: Braid tightly to ensure a neat and sleek appearance. Maintain consistent tension throughout the braid.
- Secure the Ends: Once you reach the end of your natural hair, continue braiding the extensions. Secure the ends with a hair tie or wrap them with synthetic hair.
- Shape and Customize: Shape your locs braids by rolling the ends between your palms. You can also use a hot water dipping method to set the ends.
- Maintenance and Care: Keep your locs braids clean by washing them gently with a sulfate-free shampoo. Moisturize your scalp and braids regularly to prevent dryness.
Styling Tips
- Accessorize: Embellish your locs braids with beads, cuffs, or decorative hairpins to add a personal touch.
- Updos and Bun: Create elegant updos or buns using your locs braids, keeping them stylishly contained.
- Half-Up Styles: Gather a portion of your locs braids into a half-up style for a versatile and chic look.
- Headscarves and Wraps: Experiment with colorful headscarves or wraps to add flair and protect your locs braids.
- Side Swept: Sweep your locs braids to one side for an asymmetrical and eye-catching appearance.
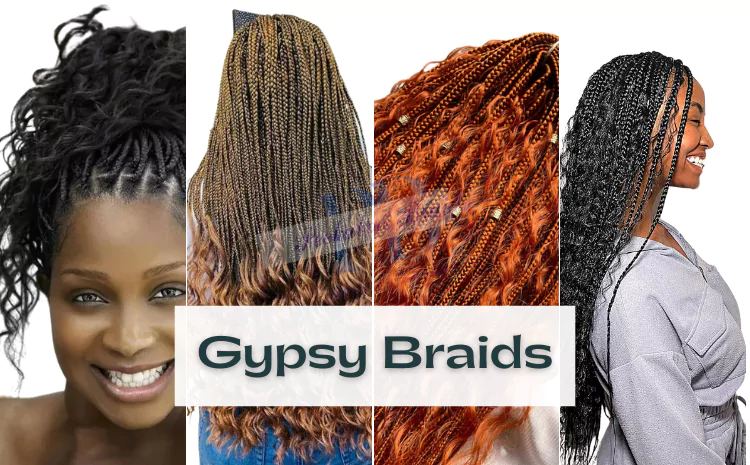
Gypsy Braids
Gypsy braids capture the essence of bohemian freedom with their loose and unstructured charm. These carefree braids radiate a whimsical aura, weaving a tapestry of artistry into your hair. Embrace the wanderlust spirit and let gypsy braids infuse your style with an enchanting and laid-back elegance.
Step-by-Step Guide
- Prepare Your Hair: Start with clean, dry hair. Gypsy braids work best on slightly textured hair, so you can enhance your natural texture using a texturizing spray.
- Part Your Hair: Create a center part or a deep side part, depending on your preference. Gypsy braids can be done on either side or both sides of your head.
- Section the Hair: Divide the hair into two or more sections, depending on how many braids you want. Use hair clips to secure the sections you’re not working on.
- Start Braiding: Begin braiding one section of hair. Keep the braid loose and carefree by not pulling too tightly on the strands.
- Add a Boho Twist: As you continue braiding, consider incorporating a few strands of different-sized ribbons, cords, or decorative strings for a boho touch. These can be intertwined with your hair as you braid.
- Leave the Ends Loose: Instead of securing the ends with an elastic, leave them loose for a free-spirited finish. You can also tie a piece of ribbon or twine around the end for an extra bohemian flair.
- Repeat on the Other Side: Once you’ve finished one braid, move on to the other side and repeat the process.
- Loosen the Braids: Gently pull on the sides of the braids to loosen them further and create a more effortless look.
Styling Tips
- Accessorize: Embrace the boho vibe by adding feathers, beads, or small decorative charms to your braids. These accents enhance the gypsy feel.
- Flower Power: Tuck small flowers, real or artificial, into your braids for a whimsical and romantic touch.
- Half-Up Style: Gather the braids from both sides into a half-up, half-down style for an enchanting look that keeps the braids visible.
- Messy Bun: Twist the braids into a messy bun at the back for a casual and carefree updo.
- Headband Braid: Braid a small section of hair along your hairline like a headband, and let the rest of your hair flow freely.
Dreadlock Braids
Dreadlock braids combine the structure of braiding with the distinctive look of dreadlocks. These tightly woven and intertwined braids offer a fusion of styles, creating a unique and textured appearance. Ideal for those seeking a blend of artistic expression and cultural influence in their hairstyle.

Step-by-Step Guide
- Preparation: Start with clean, dry hair. If desired, add extensions for length and thickness.
- Sectioning: Part your hair into sections based on your desired braid size. Smaller sections create more intricate dreadlock braids.
- Braiding: Take a small section from one part and divide it into three strands. Begin braiding by crossing the left strand over the middle, then the right strand over the new middle strand.
- Incorporating Extensions: If using extensions, add them as you continue braiding. Intertwine them with your natural hair for a seamless look.
- Tightening: As you braid, make sure to maintain even tension for a consistent and tight appearance.
- Twisting: After a few cross-overs, start twisting each strand as you continue braiding. This twist gives the appearance of dreadlocks.
- Securing: Braid all the way down and secure the end with a hair tie, elastic band, or wrap.
Styling Tips
- Maintenance: Regularly palm roll your dreadlock braids to encourage the formation of tighter, more defined dreadlocks.
- Accessories: Embellish your dreadlocks with beads, cuffs, or decorative threads to add a personal touch.
- Versatility: Style your dreadlock braids into updos, buns, or ponytails for different looks.
- Hydration: Keep your scalp and braids moisturized to prevent dryness and breakage.
- Sleep Care: Protect your dreadlock braids with a silk or satin scarf to maintain their shape while you sleep.
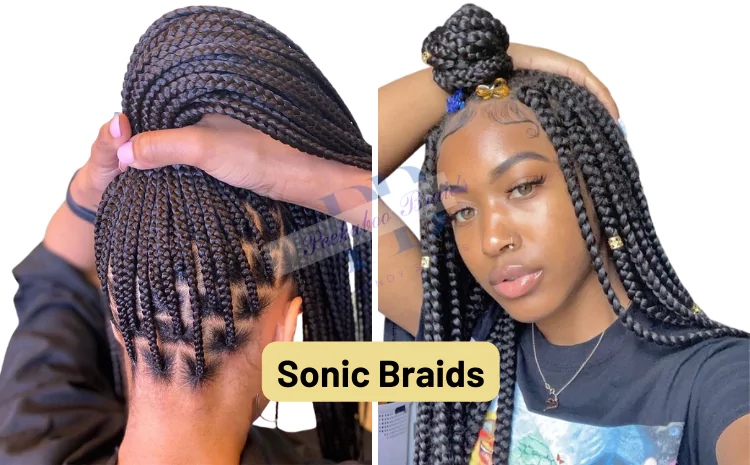
Sonic Braids
Sonic Braids capture dynamic energy with vibrant, zig-zag patterns inspired by the iconic speedster. These braids embody movement, adding a playful and edgy touch to your style. Channel Sonic’s spirit with this bold and unique braid choice, perfect for those who want to make a statement and stand out.
Step-by-Step Guide
- Preparation: Start with clean, dry hair. If desired, add hair extensions for length and volume.
- Sectioning: Divide your hair into sections based on the desired thickness of your braids.
- Braiding Pattern: Begin braiding each section using a zig-zag or criss-cross pattern, resembling Sonic’s speedy motion.
- Tight Braids: Braid tightly and close to the scalp for a secure hold and to showcase the dynamic pattern.
- Secure Ends: Use small elastic bands or hair ties to secure the ends of each braid.
- Customization: Enhance the look by adding colorful beads, cuffs, or accessories to the braids.
- Finishing Touches: Set the style with hairspray or a light styling product to prevent frizz and keep braids in place.
Styling Tips
- Accessorize: Add beads or cuffs that complement the vibrant and energetic theme of Sonic Braids.
- Half-Up Style: Gather some braids into a half-up, half-down hairstyle to showcase the pattern while keeping hair off your face.
- High Ponytail: Create a high ponytail using all the braids for a fun and attention-grabbing look.
- Side Sweep: Sweep the braids to one side for a cascading effect that emphasizes the zig-zag pattern.
- Color Play: Experiment with colorful extensions or temporary hair dye to enhance the Sonic-inspired vibe.
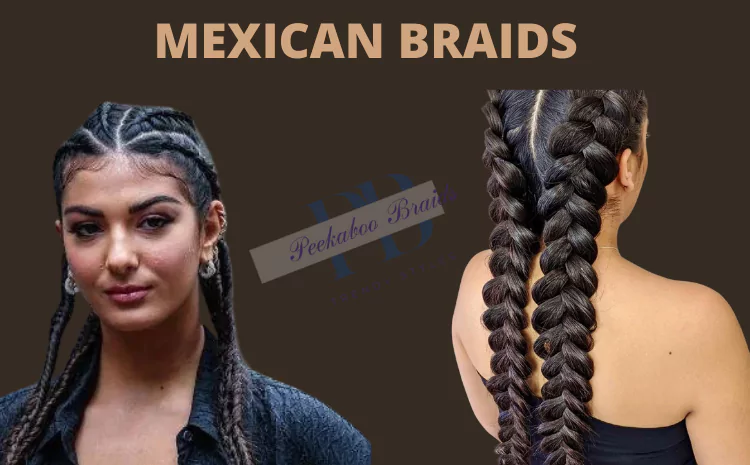
Mexican Braids
Mexican braids, a vibrant cultural expression, infuse hair with lively colors and intricate patterns, embodying the rich heritage of Mexico. These braids are a captivating blend of art and tradition, celebrating individuality while paying homage to the country’s history and diversity.
Step-by-Step Tutorial for Mexican Braids
- Preparation: Start with clean, dry hair. Brush out any tangles and apply a light styling product to add texture.
- Sectioning: Divide your hair into sections using a rat-tail comb. Choose the size and number of sections based on your desired braid style.
- Color Selection: Select vibrant, colorful hair extensions that reflect the lively spirit of Mexican culture.
- Attaching Extensions: Begin at the roots, attach the colored extensions to your natural hair using the “feed-in” method. Secure each extension with a rubber band.
- Braiding: Start braiding your natural hair along with the extensions. Incorporate the colorful strands as you go, creating a visually striking pattern.
- Tightness: Braid tightly but not excessively to prevent discomfort. Ensure the extensions are securely attached.
- Adding Accessories: Integrate decorative elements like beads, cuffs, or ribbons into your braids for an extra touch of flair.
- Repeat: Continue braiding, incorporating extensions and maintaining an even tension until you reach the desired length.
- Securing Ends: Once you’ve braided to the ends, secure each braid with a hair elastic or a decorative band.
Styling Tips for Mexican Braids
- Color Play: Experiment with a combination of vibrant and complementary colors to create a captivating visual effect.
- Cultural Accents: Add traditional Mexican accessories like flowers, feathers, or intricate hairpins for an authentic touch.
- Side Swept: Sweep your braids to one side for an asymmetrical and eye-catching look.
- Updo Variations: Transform your Mexican braids into chic updos, buns, or ponytails for versatile styling options.
- Braid Embellishments: Integrate small fabric flowers, colorful threads, or tiny pompoms along the length of your braids.
- Hair Jewelry: Adorn your braids with delicate jewelry pieces, such as metal cuffs or dangling charms, to enhance their uniqueness.
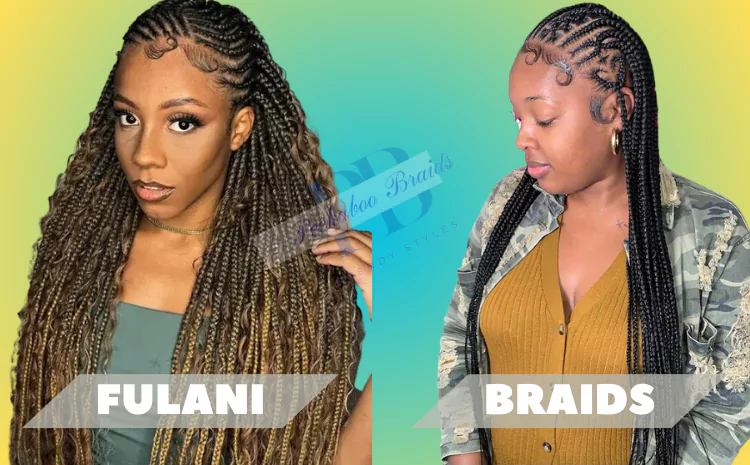
Fulani Tribal Braids
Fulani tribal braids, a striking African tradition, artfully weave cornrows along the sides and crown, adorned with beads and shells for cultural elegance. These braids symbolize identity, heritage, and beauty, captivating with their intricate patterns and celebrating the spirit of the Fulani people.
Step-by-Step Guide for Fulani Tribal Braids
- Preparation: Wash and condition your hair. Detangle and moisturize to ensure a smooth braiding process.
- Parting: Create a center part from your forehead to the nape of your neck. Divide hair into sections on each side.
- Cornrows: Begin cornrowing hair along the sides, starting close to the scalp. Angle the braids diagonally or horizontally, following the contours of your head.
- Extensions (Optional): If desired, add extensions for length and volume as you braid. Secure extensions with small rubber bands.
- Beads and Shells: Thread beads and shells onto the ends of the braids for a distinctive Fulani touch. Secure them in place by tightly wrapping the braids.
- Crown Design: Leave a section of hair unbraided down the center. Create intricate patterns, swirls, or twists on this section, emphasizing Fulani artistry.
- Front Braids: On the center section, create individual braids with extensions that fall towards your face. Decorate these with beads or cuffs.
Styling Tips for Fulani Tribal Braids
- Accessories: Embrace Fulani heritage by using traditional beads, shells, and cuffs to embellish the braids.
- Edge Control: Apply edge control or gel to keep your edges smooth and sleek, enhancing the overall look.
- Versatility: Experiment with various patterns, angles, and bead arrangements for a personalized twist.
- Updos: Transform your Fulani braids into stylish updos, buns, or ponytails for different occasions.
- Moisturize: Keep your scalp and braids moisturized to maintain healthy hair.
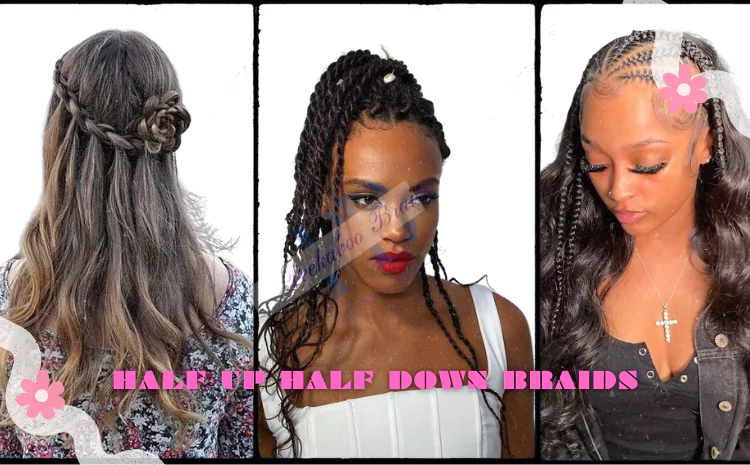
Half Up Half Down Braids
Half up half down braids offer the best of both worlds, blending sophistication and casual charm. Elevate your look with intricately woven braids that frame your face while leaving the remaining hair flowing freely. This versatile style effortlessly complements various occasions, from casual outings to elegant events, ensuring a stylish statement.
Step-by-Step Guide
- Preparation: Start with clean, dry hair. Detangle and apply a lightweight styling product for hold.
- Sectioning: Divide hair horizontally, creating a top and bottom section. Clip the top section away.
- Top Braids: Take a small section from the front of the top section. Divide into three strands and begin a regular three-strand braid. Incorporate hair from each side as you braid towards the back of your head. Secure with a small elastic band.
- Repeat on the Other Side: Repeat the braiding process on the other side of the top section. Make sure the braids are symmetrical and aligned.
- Secure: Gather both braids together at the back of your head. Use a clear elastic band to secure them in place.
Styling Tips
- Texture: Curl or wave the remaining loose hair for added texture and dimension.
- Teasing: Gently tease the crown of your hair before gathering for more volume.
- Accessories: Add decorative pins, clips, or flowers to enhance the look.
- Extensions: Incorporate extensions for longer and thicker braids.
- Bottom Section: Release the clipped bottom section of hair.
- Styling: Leave the bottom section down for flowing locks or style as desired.

Hi there! I’m M.Afzal, a passionate and experienced hair stylist with a love for creating unique and trendsetting looks. With years of expertise in the industry, I’m dedicated to sharing top-notch advice and inspiring ideas to elevate your hairstyle game. Join me on this journey of beauty and self-expression as we explore the captivating world of peekaboo braids and much more!